I still remember the exact moment I noticed it.
I was walking past the hallway wall one evening when something caught my eye — a thin, jagged line running from the corner of the door frame upward toward the ceiling. At first, I thought it was a shadow. Then I touched it.
It wasn’t a shadow. It was a crack.
And not a tiny hairline one either. It looked deep enough to worry me… and suddenly my mind went into full panic mode. Was my house shifting? Was the structure unsafe? Would the wall collapse?
If you’ve ever spotted a wall crack that made your stomach drop, you know the feeling.
The good news is this: most wall cracks are fixable, and many are completely harmless once properly repaired. The even better news is that you can repair many of them yourself with simple tools and the right steps.
In this guide, I’ll walk you through exactly what I did to inspect, understand, and repair the crack that genuinely scared me — plus what I learned along the way so you don’t make the same mistakes I almost did.
Understanding the Wall Crack That Made Me Panic
Before repairing anything, I needed to understand what kind of crack I was dealing with. This step matters more than people think.
Not all wall cracks are the same.
Some are purely cosmetic. Others signal structural movement. Fixing the surface without understanding the cause can mean the crack returns… sometimes worse.
What My Crack Looked Like
Here’s what I noticed:
- It started at the top of a door frame
- It angled upward toward the ceiling
- It was about 2–3 mm wide at the widest point
- No bulging or dampness
- No cracking on the opposite side of the wall
After some research and careful inspection, I learned this pattern is very common in homes where walls settle slightly over time. Door and window corners are stress points, so cracks often form there.
That realization lowered my stress level — but I still wanted to repair it properly.
Common Causes of Wall Cracks (What I Learned First)
Understanding why cracks form helps prevent them from returning.
Here are the most common causes homeowners deal with:
Normal settling
Buildings naturally shift slightly over time. Minor movement creates stress that shows up as cracks.
Temperature changes
Walls expand and contract with heat and cold, especially plaster and drywall.
Moisture changes
Humidity fluctuations can make materials swell and shrink.
Poor original finishing
Sometimes plaster or joint compound wasn’t applied properly during construction.
Structural movement
This is the serious one. Foundation shifting or load problems can create large or widening cracks.
My crack turned out to be a typical settling crack, which meant I could repair it safely myself.
How I Checked If the Crack Was Serious
Before grabbing tools, I did a quick safety evaluation. I strongly recommend doing the same.
Warning signs of structural damage
If you see any of these, get professional help:
- Crack wider than 5 mm
- Crack getting longer or wider over time
- Diagonal cracks across multiple walls
- Doors or windows sticking suddenly
- Uneven floors
- Wall bulging
- Water seepage
I monitored my crack for two weeks. It didn’t change. That gave me confidence to repair it myself.
Tools and Materials I Used
Everything I needed was simple and affordable.
- Putty knife
- Utility knife
- Fine sandpaper
- Wall filler or joint compound
- Primer
- Matching paint
- Clean cloth
- Small brush or roller
That’s it. No special equipment required.
Step-by-Step Wall Crack Repair (What Actually Worked)
This is the exact process I followed, and it made the wall look brand new.
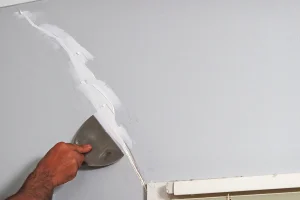
Step 1: Clean and open the crack
This step surprised me the most.
My first instinct was to just fill the crack. That would have failed.
Instead, I gently widened the crack slightly using a utility knife. This helps the filler bond properly instead of just sitting on the surface.
Then I brushed away dust and wiped the area clean.
Why this matters: filler sticks better to clean, solid edges.
Step 2: Apply wall filler properly
I pressed filler deep into the crack using a putty knife.
The key is pushing firmly so there are no air pockets inside.
I slightly overfilled the crack because filler shrinks a little when drying.
Then I smoothed the surface as evenly as possible.
Drying time depends on product instructions. Mine took about 4 hours.
Step 3: Sand the surface smooth
After drying, I gently sanded the area until it blended perfectly with the wall.
This step determines whether the repair looks professional or obvious.
Light pressure works best. Too much sanding removes filler.
Step 4: Apply primer
I almost skipped this step — and I’m glad I didn’t.
Primer seals the repaired area so paint absorbs evenly. Without primer, patched spots often look dull or discolored.
One thin coat was enough.
Step 5: Repaint the wall
Finally, I painted over the repaired area.
I feathered the paint outward to blend with the existing wall. After drying, the crack was completely invisible.
You could stand right next to it and see nothing.
That moment felt incredibly satisfying.
Practical Tips I Learned the Hard Way
Some lessons only come from doing the work yourself.
Don’t rush drying time
I once tried sanding filler before it fully dried. It crumbled and I had to redo everything.
Patience saves effort.
Thin layers work better than thick ones
If a crack is deep, apply filler in layers. Thick filler can shrink and crack again.
Always match wall texture
Smooth walls are easy. Textured walls require careful blending. Practice on scrap material if needed.
Use proper lighting when sanding
Side lighting helps reveal bumps and uneven spots.
Monitor repaired cracks
Check the area over the next few months. If it reappears, movement may still be happening.
Mistakes People Often Make When Repairing Wall Cracks
I almost made some of these myself.
Filling without cleaning
Dust prevents strong bonding.
Ignoring the cause
If moisture or movement continues, cracks return.
Painting without priming
Results in visible patch marks.
Using cheap filler
Low-quality filler can shrink or crumble.
Over-sanding
Creates dents that require more repair.
Avoiding these makes a huge difference.
Real Example: When My Neighbor’s Repair Failed
A neighbor noticed a crack similar to mine and filled it quickly without widening or cleaning it.
It looked fine for two weeks.
Then the crack reappeared… exactly the same.
Why? The filler never bonded inside the crack. It just covered the surface.
After redoing it properly, the repair lasted permanently.
When You Should Not Repair a Crack Yourself
Some cracks require professional inspection.
Call a structural expert if:
- Crack grows quickly
- Multiple cracks appear suddenly
- You see foundation cracks outside
- Doors or windows shift
- Ceiling cracks appear with wall cracks
Repairing cosmetic damage is fine. Structural issues are not DIY territory.
Preventing Future Wall Cracks
After fixing mine, I wanted to prevent more.
Here’s what helps:
Maintain stable indoor humidity
Extreme dryness or dampness stresses walls.
Fix leaks immediately
Moisture weakens materials.
Avoid heavy wall loads
Large wall-mounted items can stress surfaces.
Repaint periodically
Paint helps seal surfaces from moisture.
Monitor seasonal changes
Small cracks can appear during extreme weather. Early repair keeps them minor.
How Long Does a Proper Wall Crack Repair Last?
If the underlying cause is stable, repairs can last many years — even permanently.
Mine has remained perfect for over a year with zero reappearance.
The key is proper preparation and application.
FAQs
Is it normal for houses to develop wall cracks?
Yes. Most homes develop small cracks due to settling and temperature changes. Minor cracks are very common and usually harmless.
Can I repair a wall crack without sanding?
Technically yes, but the result often looks uneven. Sanding helps create a seamless finish.
How do I know if a crack is structural?
Large, widening, or multiple cracks combined with shifting doors, uneven floors, or wall bulging may indicate structural problems.
What is the best filler for wall cracks?
Standard wall filler or joint compound works well for most interior cracks. Choose one designed for your wall type.
Why does my repaired crack keep coming back?
This usually means movement or moisture is still affecting the wall. The cause must be fixed before repairing again.
Conclusion
That crack genuinely frightened me at first. I imagined expensive repairs, structural danger, and major home damage.
Instead, I learned something important: most wall cracks are manageable, understandable, and repairable with the right approach.
The key lessons I took away were simple but powerful:
Understand the cause before repairing.
Prepare the surface properly.
Use the right materials patiently.
Watch for warning signs of structural issues.
Once I followed these principles, the repair was straightforward — and the result looked professionally done.
If you’ve noticed a wall crack that’s making you uneasy, don’t panic. Inspect it carefully, understand what you’re dealing with, and follow a proper repair process.
You might discover, just like I did, that what looked frightening at first was actually a simple fix waiting for the right steps.