I’ll admit it — when I first noticed the deep scratch and minor crack across one of my wooden floor planks, I panicked. It wasn’t just an aesthetic issue; the damage felt structural, and my mind immediately jumped to the worst-case scenario: having to replace the entire floor. The thought of tearing up the living room, spending hundreds — maybe even thousands — on new boards, and dealing with the mess made my stomach turn.
But after a little research, a hands-on approach, and some trial and error, I discovered a repair technique that not only restored the floor’s appearance but also prevented a costly replacement. In this guide, I’ll share exactly how I tackled the problem, step by step, including practical tips, mistakes to avoid, and real insights that anyone can use.
Understanding the Problem: Why Floors Fail
Before rushing to repair, it’s crucial to understand why floors get damaged in the first place. Knowing the root cause can help prevent the issue from recurring and ensure the repair lasts.
Common Causes of Floor Damage
- Water Damage: Moisture can warp wood, swell laminate, or loosen tiles. In my case, a minor dishwasher leak had caused slight swelling along a few boards.
- Accidental Impact: Dropping heavy objects or dragging furniture can create scratches, dents, or cracks. I had moved a bookshelf recently, which likely caused the initial stress.
- Wear and Tear: High-traffic areas naturally wear down finishes and weaken boards over time.
- Improper Installation: Floors without proper expansion gaps or uneven subfloors are prone to buckling or popping.
Identifying the cause is essential. If water is involved, addressing the source is as important as repairing the visible damage. Otherwise, a patch or filler might fail within months.
Step-by-Step Solution: Saving My Floor
Here’s the process I followed to repair my floor, which is beginner-friendly and doesn’t require a professional unless the damage is extensive.
Step 1: Assess the Damage
I started by examining the floor closely:
- Checked if the crack or scratch went through the entire board
- Looked for swelling, warping, or loose edges
- Determined whether surrounding boards were affected
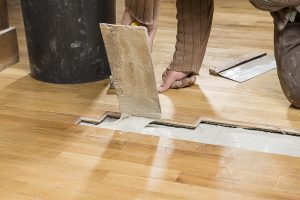
I realized the damage was localized: a single plank had a crack and slight surface swelling. This meant I could repair it without replacing the board.
Tip: Use a flashlight at an angle to highlight scratches, cracks, or gaps. This helps identify areas that need extra attention.
Step 2: Clean the Area
Before applying any repair materials, I cleaned the damaged section thoroughly:
- Removed dust and debris using a soft brush
- Wiped the area gently with a damp cloth, then allowed it to dry completely
Mistake to Avoid: Never apply filler over dust, dirt, or moisture. It will prevent proper adhesion and reduce durability.
Step 3: Choose the Right Repair Materials
The type of floor determines the repair material:
- Hardwood: Stainable wood filler, epoxy filler, or wood putty
- Laminate: Laminate repair kits with colored putty or filler sticks
- Tile: Grout or epoxy-based fillers for chips
I chose a stainable wood filler for my oak floor. It matched the color, was easy to apply, and allowed me to sand it flush with surrounding boards.
Step 4: Fill the Crack or Scratch
Applying the filler carefully is critical:
- Pressed the filler into the crack using a putty knife, slightly overfilling to account for shrinkage
- Smoothed the surface to remove excess material
- For deeper cracks, applied the filler in layers, allowing each to dry before adding the next
Pro Tip: For narrow cracks, use a small artist brush to push filler deep into the crevice. This ensures a strong bond.
Step 5: Dry and Sand the Area
After the filler cured (per manufacturer instructions), I sanded the surface gently:
- Used fine-grit sandpaper (220–400 grit)
- Sanded until the patched area was flush with surrounding boards
- Wiped dust away before applying finish
Sanding carefully prevents uneven spots and blends the repair seamlessly with the floor.
Step 6: Restore the Finish
To match the original floor, I:
- Applied a matching wood stain
- Sealed the patch with polyurethane for durability
- Buffed lightly to blend sheen with surrounding boards
The floor looked almost as if the damage had never happened. This step also protects against future wear and moisture.
Practical Tips and Mistakes to Avoid
Repairing a floor successfully isn’t just about materials — technique matters. Here are insights I learned:
Tip 1: Match Colors Carefully
Always test stain or filler on a hidden section. Floors age and darken over time, so a perfect match may need slight adjustments.
Tip 2: Don’t Rush Drying
Allow each filler layer to dry fully. Rushing can lead to shrinkage or cracking.
Tip 3: Use Proper Tools
A putty knife, sanding block, fine-grit sandpaper, and soft cloths are essential. Improvising with household items often results in uneven finishes.
Tip 4: Inspect for Moisture First
If water caused the damage, dry the floor completely and address the leak before repairing. Otherwise, the patch will fail.
Tip 5: Maintain the Floor
Regularly polish and clean your floor, and use furniture pads to prevent dents, scratches, and cracks.
Real-Life Examples That Worked
- Small Oak Crack: My crack was narrow and shallow. Wood filler, sanding, and finishing made it unnoticeable.
- Kitchen Water Spot: A minor dishwasher leak caused swelling. Drying with fans followed by epoxy filler restored the floor.
- Laminate Dent: A dropped pot caused surface dents. A laminate repair kit and colored putty stick quickly fixed it without board replacement.
These examples show that most damage, if treated quickly, can be repaired instead of replacing entire planks or floors.
When to Call a Professional
Some situations may require a professional:
- Large sections of the floor are damaged
- Subfloor is weakened or rotting
- Damage includes mold or severe water penetration
- Flooring is antique or high-end and requires exact color matching
For minor to moderate damage, however, DIY repairs are often sufficient and cost-effective.
FAQs
Q1: Can a small crack lead to major floor replacement?
Yes, if ignored. Cracks can expand, especially with moisture or temperature changes. Prompt repair prevents further damage.
Q2: How long does a DIY floor patch last?
With proper application and finish, a patch can last years under normal foot traffic.
Q3: What’s the best filler for hardwood floors?
Stainable wood filler or epoxy filler works best, depending on the crack depth and plank type.
Q4: Can laminate floors be repaired like wood?
Yes, using laminate repair kits or colored putty designed specifically for laminate planks.
Q5: How do I prevent future floor damage?
Use protective pads under furniture, clean spills immediately, maintain humidity levels, and polish regularly.
Conclusion:
What started as a stressful crack in my floor turned into a manageable project. By understanding the cause, choosing the right filler, applying it carefully, and finishing properly, I avoided a costly replacement. Not only did the repair restore my floor’s appearance, but it also strengthened the damaged section, preventing further issues.
The key lessons I learned: act quickly, use the right materials, and pay attention to detail. Most floor damage doesn’t require professional intervention — with patience and the right approach, you can save your floor, time, and money. A small repair can make a huge difference, preserving the beauty and durability of your home for years to come.