There’s nothing more frustrating than walking across your wooden floor and hearing those irritating creaks echo under your feet. I remember the first time it happened in my living room — every step sounded like an old pirate ship groaning at sea. I tried to ignore it at first, thinking it was normal, but the creaks started to get louder and more frequent. After a bit of trial and error, I found some simple, effective fixes that stopped the creaking and restored the smooth feel of my wooden floor. If you’re facing the same problem, here’s exactly what worked for me.
Understanding Why Wooden Floors Creak
Before rushing to fix the creak, it’s important to understand why it happens. Wooden floors aren’t like tile or concrete — they move. Changes in humidity, temperature, and even the age of your home can make the boards shift and rub against each other or the subfloor.
Common Causes of Floor Creaks
- Loose Floorboards: Over time, nails or staples can loosen, allowing boards to move slightly with each step.
- Humidity Fluctuations: Wood expands when it absorbs moisture and contracts when it dries. This movement can create friction between boards.
- Subfloor Issues: Sometimes, the floor beneath the wood has gaps or is uneven, causing squeaks.
- Wear and Tear: Older floors naturally develop creaks as the wood ages and fasteners loosen.
Knowing the cause helps you pick the right solution. For me, it was mostly loose boards combined with minor humidity changes — a common scenario in homes with older wooden flooring.
Quick Fixes for Creaking Wooden Floors
When I finally decided to tackle my squeaky floor, I wanted something practical that didn’t require replacing boards or calling a contractor. Here’s what I did, step by step.
Step 1: Locate the Source of the Creak
First, I needed to identify the exact spots that were causing the noise. I put on socks and slowly walked across the floor, marking every squeaky board with painter’s tape. Walking in bare feet works too, but socks make the friction more noticeable. This step is crucial — fixing random boards won’t solve the problem if you miss the real culprits.
Step 2: Apply Powder or Lubricant for Minor Squeaks
For minor creaks, a simple powder can do wonders. I used talcum powder, which I had in the bathroom. Sprinkle it generously between the boards, then gently work it in by rubbing the area with a soft brush. The powder fills tiny gaps and reduces friction between boards.
Pro tip: Cornstarch or graphite powder works similarly. Avoid using oil-based lubricants directly, as they can stain the wood.
Step 3: Secure Loose Boards
If the creak is caused by a loose board, it needs to be fastened. I used a few tools for this:
- Finishing nails or screws: A small nail or screw can hold the board tightly against the subfloor. For extra stability, I used a nail punch to sink the head slightly below the wood surface.
- Wood glue: For boards with visible gaps, a bit of glue under the edges can keep them from moving.
Make sure to drill pilot holes before screwing to prevent the wood from splitting.
Step 4: Use Shims for Subfloor Gaps
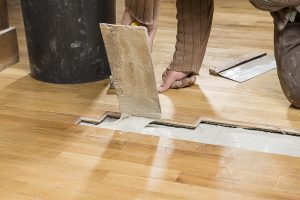
Some creaks happen because the subfloor isn’t perfectly even. In my case, one corner of the living room floor had a noticeable dip. To fix this, I gently lifted the affected boards and inserted thin wooden shims between the floor and subfloor. This stabilized the boards without lifting or replacing them entirely.
Warning: Shims need to be very thin — even a fraction of a millimeter can raise the board too much. I started with the thinnest I had and adjusted carefully.
Step 5: Consider a “Screw-and-Anchor” Method for Stubborn Areas
For especially stubborn squeaks, I used a method often called the “screw-and-anchor” technique:
- Mark the squeaky spot.
- Drill a small hole through the floorboard into the subfloor.
- Insert a screw and tighten just enough to pull the board snug.
- Cover the screw head with wood filler or a plug that matches your floor.
This method can permanently stop squeaks without visible damage.
Practical Tips and Mistakes to Avoid
Through trial and error, I learned a few tips that made the process faster and less frustrating.
Tip 1: Don’t Rush
Patience is key. Jumping from one fix to another without checking results can make things worse. Work slowly, test the floor after each fix, and adjust if needed.
Tip 2: Avoid Excessive Force
Hammering nails too hard or forcing screws can crack boards. Gentle, measured pressure works best. I learned this the hard way when a board near the fireplace split slightly — thankfully, a tiny wood filler patch covered it.
Tip 3: Mind Humidity Levels
Wood is sensitive to humidity. I noticed my floor creaked more in winter when the air was dry. Using a humidifier in dry months helped reduce expansion and contraction, keeping boards snug.
Tip 4: Keep Tools Handy
Here’s what I found useful:
- Tape measure and pencil
- Painter’s tape (to mark squeaks)
- Talcum powder or graphite powder
- Screwdriver or drill
- Finishing nails or screws
- Nail punch
- Wood glue and shims
- Wood filler or plugs
Having everything ready makes the repair process smoother.
Tip 5: Regular Maintenance Helps
Once I fixed the major squeaks, I made a habit of checking my floor every few months. Tightening loose nails or applying powder to small gaps early prevented bigger problems later.
Real-Life Examples That Worked
- Living Room Boards: The corner near my sofa was loose. Adding screws and a small shim stopped the creak immediately. I only needed two screws per board.
- Hallway Creak: The hallway had minor squeaks along the edges. Sprinkling talcum powder and working it in with a brush eliminated most noises without lifting a single board.
- Bedroom Expansion: In my bedroom, a few boards expanded in winter. A humidifier helped stabilize them until spring, preventing the creaks from returning.
These solutions saved me hundreds of dollars on professional repairs and only took a few hours in total.
When to Call a Professional
Not every creak can be fixed with home methods. If you notice any of the following, it’s wise to consult a professional:
- Boards are severely warped or cracked.
- Large gaps appear between boards and the subfloor.
- Creaking is accompanied by structural issues like sagging.
- You’re uncomfortable using tools or lifting boards.
A professional can assess the subfloor condition and ensure repairs are safe and long-lasting.
Maintaining a Quiet Wooden Floor
After fixing my squeaks, I adopted a few habits to keep my wooden floor quiet:
- Climate control: Keep indoor humidity between 35–55%.
- Protective rugs: Place rugs in high-traffic areas to reduce wear.
- Furniture pads: Prevent scratches and movement that loosen boards.
- Routine checks: Inspect floors every few months for early signs of squeaks.
Consistency here prevents small problems from becoming big repairs.
FAQs
Q1: Can I fix floor creaks without lifting any boards?
Yes, minor squeaks caused by friction between boards can often be fixed with talcum powder, graphite, or similar lubricants.
Q2: How do I know if a squeak is from a loose board or the subfloor?
Walk slowly across the floor. If the noise follows a single board, it’s likely loose. If it happens in multiple spots or along the floor pattern, the subfloor may be the issue.
Q3: Are there risks to drilling screws into wooden floors?
Yes. Drilling incorrectly can split boards or damage the finish. Always use a pilot hole and consider covering screw heads with filler or plugs.
Q4: Will humidity changes always cause floor creaks?
Not always, but they often contribute. Wood expands when humid and contracts when dry, which can increase friction and make existing loose boards squeak.
Q5: Can rugs help prevent creaks?
Indirectly, yes. Rugs reduce foot traffic impact and limit movement on high-traffic boards, which can prevent wear that leads to creaks.
Conclusion
Fixing a creaking wooden floor doesn’t have to be complicated or expensive. By understanding the cause, carefully locating the squeaks, and applying simple, practical solutions like powder, screws, shims, or glue, you can restore your floor to its original quiet, smooth state. From my personal experience, a bit of patience and the right tools make all the difference. Not only will your floor stop groaning, but you’ll also gain the satisfaction of solving a common household problem yourself.
With regular maintenance and awareness of humidity levels, these fixes can last for years, keeping your wooden floor quiet, safe, and enjoyable under every step.