I thought it was just a paint line… until it kept growing
One evening, while rearranging my bedroom furniture, I noticed a thin line running across the wall near the ceiling. At first, I assumed it was just a paint mark or a shadow. But when I ran my finger over it, I felt a slight groove.
It was a crack.
I told myself it was nothing serious. Walls crack sometimes, right? So I ignored it.
A few weeks later, I noticed something unsettling — the crack had stretched further across the wall. It wasn’t dramatic, but it was clearly longer than before. That’s when worry kicked in.
Was my wall damaged?
Was the house shifting?
Would it get worse?
And most importantly… could I fix it myself?
The good news is yes — I fixed it quickly, safely, and without professional help. Even better, the repair lasted. No reappearing cracks. No peeling paint. No hidden damage.
If your bedroom wall has developed cracks, here’s exactly what happened to me, how I figured out the cause, and the simple method I used to fix it properly.
Why Bedroom Wall Cracks Happen (And Why Mine Appeared)
Before repairing anything, I needed to understand why the crack formed. Fixing the surface without addressing the cause is like putting tape over a leaking pipe. It won’t last.
After researching and inspecting my room carefully, I learned that bedroom wall cracks usually come from a few common reasons.
Natural building settlement
Houses shift over time. Materials expand, contract, and adjust to weight distribution. This often causes small cracks near ceilings, corners, and door frames.
This turned out to be the main cause in my case.
Temperature changes
Bedrooms often experience big temperature swings — especially if sunlight hits one wall for hours daily. Expansion and contraction stress the plaster.
Humidity fluctuations
Moist air weakens wall material. When it dries, it shrinks unevenly, creating hairline cracks.
Poor plaster bonding
Sometimes the plaster or paint layer simply doesn’t adhere well and separates over time.
Structural stress (less common but serious)
Large, jagged, or widening cracks may indicate deeper movement in the building structure.
How I Checked If My Crack Was Safe to Fix Myself
This step is critical. Not every wall crack should be repaired without professional advice.
I carefully examined mine and looked for warning signs.
My crack was:
- Thin and narrow
- Mostly straight
- Not rapidly growing
- No moisture or staining nearby
- Located on a flat interior wall
- No bulging or crumbling surface
That told me it was cosmetic or minor settling — safe for DIY repair.
If your crack is wide, diagonal, spreading quickly, or appears near doors or windows that suddenly stick, get expert help first. Those can signal structural movement.
Once I confirmed mine was minor, I moved on to repair.
What I Used for the Quick Fix
I didn’t need expensive tools. Everything was simple and easy to find.
Here’s what I used:
- Wall filler or spackling compound
- Putty knife
- Fine sandpaper
- Soft brush or cloth
- Primer
- Matching wall paint
That’s all.
The entire repair cost less than a basic takeout meal — and it completely restored the wall.
Step-by-Step: How I Fixed My Bedroom Wall Crack
This process took a few hours including drying time. The actual hands-on work was surprisingly quick.
Step 1: I slightly opened the crack
This may sound strange, but it’s essential.
Very thin cracks don’t hold filler well. If you just smear material on top, it won’t bond deeply and can reopen.
Using the tip of my putty knife, I gently widened the crack just enough to remove loose material and create a clean channel.
Not deep. Not aggressive. Just clean and stable.
Step 2: I cleaned the surface thoroughly
Dust prevents proper adhesion.
I brushed away debris and wiped the area with a dry cloth. Some people use a damp cloth, but if you do, make sure the wall dries completely before filling.
Clean surface equals strong repair.
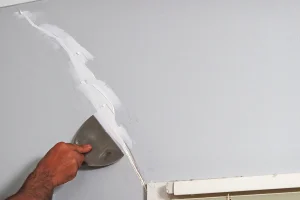
Step 3: I filled the crack properly
This is where many people rush — and where repairs fail.
I pressed filler deep into the crack using firm pressure. The goal is to completely fill the space, not just cover it.
Then I smoothed the surface so it blended with the surrounding wall.
I let it dry fully before touching it again.
Step 4: I sanded the repaired area smooth
Once dry, the filler was slightly raised.
I used fine sandpaper and gently smoothed the patch until it felt perfectly level with the wall.
This step makes the repair invisible after painting.
Step 5: I applied primer
Skipping primer is one of the biggest mistakes in wall repair.
Fresh filler absorbs paint differently, which can create dull patches or visible repair marks.
I applied a thin coat of primer and let it dry completely.
Step 6: I repainted the wall section
Finally, I applied matching paint and blended it outward slightly beyond the repair area.
When it dried, the crack completely disappeared.
Even in direct light, you couldn’t tell anything had ever been there.
Practical Tips That Made My Repair Last
Fixing a crack is easy. Making sure it stays fixed is what matters most.
Here’s what helped me avoid repeat cracking.
Fill deeply, not just on the surface
Surface patches fail quickly.
Use thin, controlled layers
Thick filler shrinks unevenly and can crack again.
Let every stage dry fully
Rushing weakens the repair bond.
Match paint carefully
Different finishes can reveal the repair even if the color matches.
Monitor the wall for a few weeks
If the crack returns quickly, something underneath is still moving.
Real Example: What Happens If You Ignore Bedroom Wall Cracks
Before fixing mine, I had seen what happened in my cousin’s apartment.
He ignored a small crack near his bed. Within months:
- The crack widened
- Paint started flaking
- Moisture entered during humid weather
- Plaster softened and crumbled
Repair required scraping a large wall section and replastering — far more work than a simple early fix.
That convinced me small cracks are never worth ignoring.
Common Mistakes People Make When Fixing Wall Cracks
I almost made some of these myself.
Painting over the crack without filling it
Paint hides cracks temporarily but they reappear quickly.
Using low-quality filler
Cheap materials shrink more and fail faster.
Skipping sanding
Even slight bumps become obvious after painting.
Ignoring the cause
If moisture or movement continues, cracks return.
Applying paint before full drying
Trapped moisture weakens adhesion.
How to Prevent Bedroom Wall Cracks in the Future
After repairing mine, I wanted to stop new ones from forming.
Here’s what helps most:
Maintain stable room temperature
Use proper ventilation to control humidity
Fix leaks immediately
Avoid drilling heavy fixtures without proper anchors
Inspect walls seasonally for early signs
Walls last longer when environmental stress stays minimal.
Frequently Asked Questions
1. Are bedroom wall cracks normal?
Yes, small hairline cracks are common, especially in newer homes or areas with temperature changes. Most are cosmetic and easy to repair.
2. How do I know if a wall crack is serious?
Wide cracks, zigzag patterns, rapid growth, or cracks near structural points may indicate deeper problems. Professional inspection is recommended in such cases.
3. Can I repair a wall crack without repainting the whole wall?
Yes. If you blend paint properly and match the finish, you only need to repaint the repaired section.
4. How long should I wait before painting after filling a crack?
Follow product instructions, but generally wait until filler is completely dry and hardened. This may take several hours or overnight.
5. Will the crack come back after repair?
If the cause was minor settling and the repair was done properly, it usually stays fixed. Ongoing structural movement may cause recurrence.
Conclusion
Fixing the crack in my bedroom wall was one of the simplest home repairs I’ve ever done — but also one of the most important.
It took minimal tools.
Very little time.
Almost no money.
And it prevented what could have become expensive wall damage later.
The biggest lesson I learned is this:
Wall cracks don’t fix themselves. But they are easiest to repair when they’re small.
If you’ve noticed a crack in your bedroom wall, don’t wait for it to grow. Inspect it carefully, repair it properly, and monitor the area afterward.
A quick fix today can save you major repairs tomorrow — and restore your peace of mind every time you look at your walls.