The moment I realized a tiny crack could turn into a big, expensive problem
It started as a thin line above my bedroom door. Honestly, I ignored it for weeks.
At first glance, it looked harmless — just a hairline crack in the wall. The kind most people assume is cosmetic. I even convinced myself it was “normal settling” and nothing to worry about.
But then one morning, I noticed something unsettling.
The crack was longer.
Not dramatically longer. But longer enough that I couldn’t pretend it was the same as before. And once I really looked at it, I realized the edges were slightly widening too.
That’s when a thought hit me hard:
If I don’t fix this now… how bad could it get?
I had seen what happens when small wall cracks are ignored — peeling paint, crumbling plaster, moisture seepage, even structural damage in worst cases. Repairs go from simple to expensive very quickly.
So I decided to act immediately.
What surprised me most was this: fixing the crack early was far easier, cheaper, and faster than I expected. No professional needed. No complicated tools. Just patience and the right method.
Here’s exactly how I handled it — step by step — so you can stop a wall crack before it spreads too.
Understanding Why Wall Cracks Appear in the First Place
Before fixing anything, I needed to understand what caused the crack. Otherwise, I’d just be covering the symptom instead of solving the problem.
Most wall cracks happen because of one of these reasons:
Natural settling of the building
Houses shift slightly over time. Foundations adjust, materials expand and contract, and minor cracks appear. These are common in newer buildings but can happen anytime.
Temperature and humidity changes
Walls expand in heat and contract in cold. Repeated cycles create stress lines that eventually crack.
Poor plaster or paint adhesion
If the surface wasn’t prepared properly when painted or plastered, cracks can form as materials dry or age.
Structural movement
This is more serious. Large, diagonal, or widening cracks may indicate foundation movement or load stress.
Moisture damage
Water weakens wall materials. When they dry, they shrink unevenly, causing cracks.
How I Determined My Crack Was Safe to Repair Myself
This step is important. Not every crack is a DIY job.
I inspected mine carefully and checked for warning signs.
My crack was:
- Thin and straight
- Not wider than a few millimeters
- Located above a door frame
- Dry with no water stains
- Not growing rapidly
That meant it was most likely a cosmetic or minor settling crack.
If your crack is wide, zigzag shaped, spreading quickly, or appears near structural supports, get professional help first. Early inspection is always cheaper than structural repair.
Once I was confident mine was minor, I gathered my tools.
What I Used to Fix the Wall Crack
Everything I needed was simple and affordable.
- Putty knife
- Wall filler or spackling compound
- Fine sandpaper
- Small brush or cloth
- Primer
- Matching wall paint
That’s it. No heavy tools. No special equipment.
The total cost was far less than hiring someone — and the repair looked professional when finished.
Step-by-Step: How I Fixed the Wall Crack Properly
Step 1: I widened the crack slightly
This sounds strange, but it’s important.
If you just smear filler over a narrow crack, it may not stick well. The surface bond is weak, and the crack can reappear.
So I used the edge of a putty knife to gently open the crack just a little. Not aggressively. Just enough to remove loose material and create a clean channel.
This gives the filler something solid to grip.
Step 2: I cleaned the area thoroughly
Dust is the enemy of adhesion.
I brushed away debris, then wiped the crack with a dry cloth. You can also use a slightly damp cloth, but the wall must be completely dry before filling.
Clean surfaces ensure long-lasting repair.
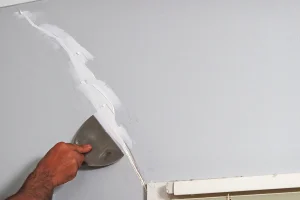
Step 3: I applied wall filler carefully
Using the putty knife, I pressed filler deep into the crack.
This part matters more than most people think. You don’t want to just cover the surface — you want to pack the material inside so there are no air gaps.
I smoothed the surface evenly and removed excess filler so it blended with the wall.
Then I let it dry completely.
Drying time depends on the product, but patience here prevents future cracking.
Step 4: I sanded the surface smooth
Once dry, the filler was slightly raised.
I used fine sandpaper and gently smoothed the area until it felt perfectly flush with the wall.
Run your fingers across it. If you can feel the repair, sand a little more.
A smooth surface makes the repair invisible after painting.
Step 5: I primed the repaired area
Skipping primer is one of the biggest mistakes people make.
Fresh filler absorbs paint differently than the surrounding wall. Without primer, you may see dull patches or uneven color.
I applied a thin layer of primer and let it dry fully.
Step 6: I repainted to match the wall
Finally, I applied matching paint.
Instead of painting just the crack line, I feathered the paint outward slightly to blend it naturally with the wall.
When it dried, the crack was completely invisible.
And more importantly — it stayed gone.
Practical Tips That Made the Repair Last Longer
Fixing a crack is easy. Making sure it doesn’t come back is the real goal.
Here’s what helped me most.
Always fill deeper than the surface
Shallow filling leads to quick re-cracking.
Use quality filler
Cheap filler shrinks more and cracks faster.
Let each layer dry fully
Rushing causes weak bonding.
Control moisture in the room
High humidity can damage plaster over time.
Monitor the crack for a few weeks
If it reappears quickly, something deeper may be moving.
Mistakes I Almost Made (And You Should Avoid)
I learned these through research and observation.
Painting without repairing first
Paint hides cracks temporarily but never fixes them.
Ignoring small cracks for months
Cracks grow slowly, then suddenly worsen.
Using too much filler at once
Thick layers dry unevenly and may shrink.
Skipping sanding
Even tiny bumps become visible after painting.
Not checking for moisture sources
If water caused the crack, repair the leak first.
Real Example: How Fast Small Cracks Can Spread
A friend of mine ignored a similar crack near a window.
Within six months:
- The crack widened
- Paint started peeling
- Moisture seeped in during rain
- Plaster began crumbling
Repair costs were several times higher than a simple early fix.
That experience confirmed I made the right decision to act quickly.
How to Prevent Wall Cracks in the Future
After fixing mine, I wanted to prevent new ones.
Here’s what helps most:
Maintain consistent indoor temperature
Fix leaks immediately
Use proper ventilation
Repaint walls periodically
Check foundation drainage around the house
Walls last much longer when environmental stress is controlled.
Frequently Asked Questions
1. Are hairline wall cracks normal?
Yes, many homes develop minor cracks due to settling or temperature changes. Small, stable cracks are usually cosmetic and safe to repair yourself.
2. How do I know if a crack is structural?
Structural cracks are often wide, diagonal, growing quickly, or near load-bearing areas. If doors stick or floors slope, get professional inspection.
3. Can I fix a wall crack without repainting the whole wall?
Yes. If you blend the paint carefully and match the color well, only the repaired area needs repainting.
4. How long does wall filler take to dry?
Most fillers dry within a few hours, but full curing can take 24 hours. Always follow product instructions.
5. Will the crack come back after repair?
If the cause was minor settling and you filled it properly, it likely won’t return. If movement continues, deeper structural issues may exist.
Final Thoughts: Fixing It Early Saved Me Time, Money, and Stress
Looking back, fixing that small wall crack was one of the smartest home maintenance decisions I’ve made.
It took less than a day.
It cost very little.
And it prevented what could have become serious damage.
The biggest lesson I learned is simple:
Small wall cracks are warning signs, not decoration.
When you address them early, repairs are quick and easy. Ignore them, and they can turn into structural headaches, expensive repairs, and long-term damage.
If you’ve spotted a crack in your wall, don’t wait for it to grow. Inspect it carefully, fix it properly, and monitor it afterward.
A simple repair today can save major repair work tomorrow.
And once you’ve done it yourself, you’ll realize something empowering — maintaining your home isn’t as complicated as it seems. Sometimes all it takes is attention, patience, and the willingness to act before small problems become big ones.