One quiet evening, while rearranging the furniture in my living room, I noticed something that made my stomach drop.
A thin, faint line ran across the wall above the window. At first, I thought it was just a shadow. But when I moved closer, I realized it wasn’t a shadow at all.
It was a crack.
Then I spotted another one. And another. Fine, hair-thin lines spreading across the paint like tiny spider webs.
My mind immediately jumped to worst-case scenarios. Foundation damage. Structural problems. Expensive repairs. Wall collapse. You name it.
But after a bit of research, some careful inspection, and a practical repair process, I discovered something reassuring: most hairline cracks in walls are completely normal and easy to fix.
In this guide, I’ll walk you through exactly what caused my living room wall cracks, how I repaired them step by step, what mistakes I almost made, and how you can fix yours safely and confidently.
If you’re staring at cracks in your wall right now wondering what to do next, this will help you solve the problem properly.
What Hairline Cracks in Walls Really Mean
Before fixing anything, I needed to understand what I was dealing with.
Hairline cracks are extremely thin surface splits that usually appear in plaster, drywall, or paint. They often develop gradually and may not even be noticeable until lighting hits the wall at a certain angle.
In my case, the cracks were:
- Very thin (like pencil lines)
- Mostly horizontal and diagonal
- Located near windows and corners
- Only visible in good lighting
After inspecting them carefully, I learned they’re commonly caused by:
Natural House Settling
Every building settles over time. Soil shifts, materials expand and contract, and the structure adjusts slightly. This is normal, especially in newer homes.
Temperature and Humidity Changes
Walls expand in heat and shrink in cold. Repeated expansion and contraction eventually stress the surface layer, causing fine cracks.
Drying and Shrinking of Plaster or Paint
If plaster or joint compound dries too quickly during construction or repair, it shrinks and forms hairline fractures.
Minor Structural Movement
Small vibrations from traffic, nearby construction, or seasonal ground movement can create stress lines.
Once I realized my cracks were thin, stable, and not spreading quickly, I felt much more relaxed. They were cosmetic, not structural.
But I still needed to fix them properly.
When Hairline Cracks Are Actually Serious
Before jumping into repairs, you must rule out bigger problems.
I checked carefully for warning signs. If you notice any of these, stop and consult a structural professional:
- Cracks wider than 3 mm
- Cracks that keep growing quickly
- Stair-step cracks in brickwork
- Doors or windows suddenly sticking
- Sloping floors
- Cracks running through multiple walls
- Bulging or bowed walls
My cracks didn’t match any of those signs. They were stable, thin, and surface-level.
That meant I could repair them myself.
The Step-by-Step Method I Used to Fix Hairline Wall Cracks
This is the exact process that worked for me. It’s simple, beginner-friendly, and doesn’t require expensive tools.
Step 1: Clean the Cracks Properly
This step is more important than it sounds.
Dust, loose paint, and debris prevent repair material from bonding. I used:
- A soft brush
- A dry cloth
- A vacuum with brush attachment
I gently removed all loose particles from inside and around the crack. The cleaner the surface, the stronger the repair.
Step 2: Slightly Widen the Crack
This might sound strange, but tiny cracks need to be opened slightly so filler can penetrate properly.
I used the edge of a scraper and gently ran it along the crack to widen it just a little. Not deep. Just enough to create space for repair compound.
This step prevents cracks from reappearing quickly.
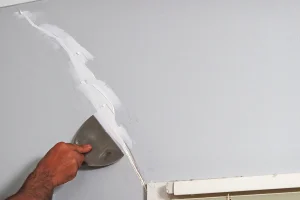
Step 3: Apply Flexible Wall Filler
Regular filler can crack again when walls move. I learned this the hard way in a previous repair.
This time, I used flexible crack filler designed for minor movement. Using a putty knife, I pressed the filler firmly into the crack, making sure it filled completely.
Then I smoothed the surface flat.
Key tip: Apply thin layers instead of one thick layer.
Step 4: Let It Dry Fully
Patience matters here.
Drying times vary depending on product and humidity. I let mine dry overnight to avoid shrinkage or weak bonding.
Rushing this step can ruin the repair.
Step 5: Sand the Surface Smooth
Once dry, I lightly sanded the repaired area using fine sandpaper. This removed excess filler and blended the patch into the wall.
The goal is a perfectly smooth surface that disappears visually.
Step 6: Prime Before Painting
Skipping primer is one of the biggest mistakes people make.
Primer seals the filler and prevents patch marks from showing through paint. Without it, the repaired spot often looks dull or uneven.
I applied a small amount of primer and let it dry completely.
Step 7: Repaint the Wall
Finally, I repainted the repaired area using the original wall color.
For best results, I feathered the paint outward slightly so it blended naturally.
Once dry, the cracks were completely invisible.
What Happened After the Repair
Months later, the cracks never returned.
That confirmed the issue was cosmetic and properly repaired.
But the experience taught me something important: preventing future cracks is just as important as fixing existing ones.
Practical Tips That Helped Me Prevent New Cracks
Maintain Stable Indoor Humidity
Extreme dryness or moisture causes wall movement. I try to keep indoor humidity moderate year-round.
Fix Water Leaks Immediately
Moisture weakens plaster and drywall. Even small leaks can cause cracking.
Use Flexible Materials for Repairs
Rigid fillers fail faster when walls shift.
Inspect Walls Seasonally
Catching cracks early makes repair much easier.
Repaint With Quality Paint
Good paint provides a stronger surface barrier.
Mistakes I Almost Made (And You Should Avoid)
Ignoring Early Cracks
Small cracks are easy to fix. Waiting allows them to grow.
Painting Over Cracks Without Filling
Paint alone does not repair structural separation.
Using Cheap Filler
Low-quality filler shrinks and cracks again.
Skipping Surface Cleaning
Dust prevents proper adhesion.
Not Monitoring Crack Growth
Always observe cracks for a few weeks before repair if unsure.
Real-Life Example: Where My Cracks Appeared Most
My living room cracks formed mainly:
- Above door frames
- Near window corners
- Along ceiling edges
- On long uninterrupted walls
These are common stress points where movement concentrates.
If your cracks appear in similar places, they’re likely normal settling or material stress.
How Much Does It Cost to Fix Hairline Wall Cracks?
My total cost was very low.
- Crack filler
- Sandpaper
- Primer
- Small amount of paint
Overall, the repair cost less than a basic home maintenance tool.
Professional repair is only necessary if structural issues exist.
How Long the Entire Process Took
Actual working time was short:
Cleaning and preparation — 20 minutes
Filling — 15 minutes
Sanding — 10 minutes
Priming and painting — 30 minutes
Drying time took longer, but hands-on effort was minimal.
In one weekend, my walls looked brand new again.
Frequently Asked Questions
1. Are hairline wall cracks normal in new homes?
Yes. New buildings often settle during the first few years. Minor surface cracks are very common and usually harmless.
2. Can I just paint over hairline cracks?
No. Paint hides them temporarily but does not repair the underlying separation. They will reappear.
3. How do I know if a crack is structural?
If it is wide, growing, or causing doors and windows to misalign, it may indicate structural movement and should be inspected professionally.
4. Will hairline cracks come back after repair?
If repaired correctly with flexible filler and proper surface preparation, they usually do not return unless major movement occurs.
5. Should I worry about cracks near windows and doors?
Not usually. These are common stress points where minor movement concentrates. Monitor them, but most are cosmetic.
Final Thoughts — What I Learned From Fixing My Wall Cracks
Finding cracks in your walls can feel alarming. I remember standing in my living room imagining expensive repairs and major structural problems.
But the reality was much simpler.
Most hairline wall cracks are cosmetic, predictable, and easy to fix with the right approach. Once I understood the cause, inspected carefully, and repaired them properly, the problem disappeared completely.
The key lessons I took away:
Understand before repairing
Use the right materials
Prepare surfaces properly
Monitor for changes
Fix small issues early
If you’re seeing thin cracks in your living room walls right now, don’t panic. Inspect them carefully, follow the repair method step by step, and you can restore your walls to a smooth, flawless finish without stress or major expense.
And honestly, the peace of mind after fixing them yourself is worth every minute spent.