I’ll never forget the morning I noticed a dark, damp patch on my wooden floor near the kitchen sink. At first, I thought it was just a spill I hadn’t cleaned, but as I watched, it seemed to grow ever so slightly. The thought of my beautiful floor warping or developing mold made me panic. Water damage spreads fast, and if not addressed immediately, it can ruin entire sections of flooring.
After some frantic research and hands-on work, I managed to stop the damage from spreading, dry the affected area, and restore my floor without replacing large sections. In this guide, I’ll walk you through exactly how I did it, step by step, so you can save your floor before a minor spill becomes a major headache.
Understanding Water Damage in Floors
Before fixing the damage, it’s important to understand why water affects floors and what makes it spread so quickly. This knowledge helps you act decisively and prevent further damage.
Why Water Damages Floors
- Wood Floors: Wood absorbs water, causing it to swell, warp, or cup. Prolonged exposure can cause permanent structural changes.
- Laminate Floors: Laminate boards are resistant but not waterproof. Water seeps into seams, causing boards to buckle.
- Tile Floors: Tiles themselves are water-resistant, but grout and subfloor can absorb moisture, leading to mold and adhesive breakdown.
- Subfloor Risks: Even if the surface looks fine, water can reach the subfloor, promoting rot and mildew.
In my case, a leaking dishwasher hose caused water to seep under the cabinets and onto the floor. If I had waited, I would have faced warped boards and a costly replacement.
Step-by-Step Solution: Saving a Water-Damaged Floor
Here’s the approach I used, which is beginner-friendly and requires minimal tools.
Step 1: Act Immediately
The first rule I learned: time is your enemy and your friend. The quicker you address water, the less damage occurs. I immediately:
- Turned off water supply to the leak.
- Removed furniture and objects from the affected area.
- Blotted standing water with towels and a mop.
Tip: Never use a vacuum meant for dry surfaces — water and electricity are dangerous together.
Step 2: Dry the Area Thoroughly
Once I removed visible water, I needed to ensure all moisture was gone, including underboards. My approach:
- Towels and Absorbent Pads: Soaked up as much surface water as possible.
- Fans and Air Circulation: Placed fans on high to dry the floor from all angles.
- Dehumidifier: Helped remove moisture from the air, reducing swelling risk.
Depending on the severity, drying can take several hours to a full day. I checked the floor frequently, ensuring no moisture remained.
Pro Tip: Avoid using heat guns or hair dryers directly on wood — sudden heat can crack or warp boards.
Step 3: Inspect for Damage
After drying, I carefully inspected the area:
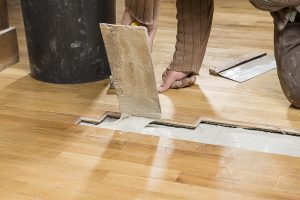
- Warped or cupped boards: If the edges rise, you may need to remove or replace boards.
- Discolored areas: Can indicate prolonged water exposure.
- Loose boards or bubbles: May need gluing or fixing.
In my case, the floor had minor swelling but no permanent warping, which meant a repair was possible without replacing boards.
Step 4: Treat the Floor
Depending on your flooring type, treatment varies:
Wood Floors:
- Sand the swollen area lightly with fine-grit sandpaper.
- Apply a wood conditioner or finishing oil to restore moisture balance.
- Reapply finish or varnish if needed.
Laminate Floors:
- Remove top boards if buckled.
- Let subfloor dry completely before reinstalling.
- Replace boards if water caused permanent damage.
Tile Floors:
- Check grout and underlayment.
- Clean grout lines with a mild bleach solution if mold appears.
- Ensure adhesive hasn’t loosened tiles.
I used a gentle sanding and wood conditioner for my oak floors. It restored the original texture and minimized swelling.
Step 5: Prevent Mold and Mildew
Moisture left behind is a breeding ground for mold. I took these steps:
- Used a disinfectant safe for wood floors.
- Increased ventilation in the area for a week.
- Checked for hidden moisture under cabinets.
Preventive measures are essential — even small leftover dampness can cause problems months later.
Step 6: Repair Minor Warping or Finish Damage
After drying, my floor had a few minor bumps and dull areas. I:
- Applied wood filler for small cracks or gaps.
- Lightly sanded and buffed the surface.
- Applied a fresh coat of varnish for shine and protection.
This step restores aesthetics and prevents scratches or future water absorption.
Practical Tips and Mistakes to Avoid
From my experience, a few lessons are worth sharing:
Tip 1: Move Fast
Water spreads quickly under flooring. Don’t wait even a few hours — immediate action drastically reduces damage.
Tip 2: Use the Right Tools
Fans, towels, and dehumidifiers are more effective than DIY methods like paper towels alone. Proper air circulation is key.
Tip 3: Avoid DIY Heat Methods
Using hair dryers or heaters directly can warp wood further. Let the floor air dry naturally with forced air circulation.
Tip 4: Check Subfloor Carefully
Even if the surface looks fine, water can damage subflooring. Inspect and ensure complete dryness before sealing or refinishing.
Tip 5: Prevent Future Damage
- Install drip trays under appliances like dishwashers and refrigerators.
- Regularly inspect plumbing and hoses.
- Use mats in high-risk areas.
Real-Life Examples That Worked
- Kitchen Leak: My dishwasher hose leaked, causing a small puddle. Acting immediately and using fans prevented permanent damage.
- Bathroom Overflow: A bathtub overflowed. Using towels, fans, and a dehumidifier for 24 hours saved wooden flooring from warping.
- Pet Accident: Water from a pet accident was dried immediately with absorbent pads and fans. Minimal staining occurred, and no warping developed.
These examples show that speed, thorough drying, and careful inspection are the keys to preventing long-term damage.
When to Call a Professional
Some water damage situations require expert help:
- Large floods affecting multiple rooms.
- Subfloor rotting or structural damage.
- Hardwood floors with deep warping or cupping.
- Persistent mold growth.
For minor spills and leaks, DIY methods can save both time and money.
FAQs
Q1: How quickly should I act after a water spill?
Immediately. Even small spills can seep into wood and subfloor within hours.
Q2: Can I save a warped wood floor?
Minor warping can be fixed by drying, sanding, and applying finish. Severe warping may require board replacement.
Q3: What’s the best way to dry a water-damaged floor?
Use towels, fans, and a dehumidifier. Ensure air circulates under and around affected areas.
Q4: Can water damage lead to mold?
Yes, especially if moisture remains under the flooring or in the subfloor.
Q5: How can I prevent water damage in the future?
Inspect plumbing regularly, use drip trays, install mats in high-risk areas, and clean spills immediately.
Conclusion
Water damage can escalate quickly, ruining floors and subfloors in a matter of hours. Acting immediately, drying thoroughly, inspecting for hidden damage, and treating the floor appropriately can save your home and prevent costly repairs. From my personal experience, minor spills or leaks don’t need to become a disaster if you know the right steps.
With careful action, proper tools, and preventive habits, you can protect your flooring, maintain your home’s beauty, and avoid the frustration of water damage spreading out of control. Remember: speed, thoroughness, and follow-up care are your best allies.