It started as something small — barely noticeable.
One drip. Then another.
At first, I ignored it. Everyone ignores a dripping faucet, right? Life is busy. There are bigger problems. But over time, that tiny sound became impossible to ignore.
Late at night, when everything else was quiet, it sounded louder than anything else in the house.
Drip… drip… drip…
I tried tightening the handle harder. I wiped the spout. I convinced myself it would stop on its own.
It didn’t.
Then my water bill went up. That’s when annoyance turned into urgency.
I considered calling a plumber, but something about paying a large service fee for a small drip didn’t feel right. So I decided to figure it out myself.
What I discovered surprised me: most faucet drips are simple mechanical problems — and fixing them is far easier than most people expect.
If that constant drip is driving you crazy too, here’s exactly what worked for me — step by step — including mistakes I made, practical tips, and what you should do differently to fix yours faster.
Why Faucets Start Dripping (And Why They Don’t Stop)
Before fixing anything, I wanted to understand the real cause.
A dripping faucet is rarely random. It almost always happens because something inside the faucet is no longer sealing properly.
Turning the handle only controls water flow — it doesn’t repair worn internal parts.
Here are the most common reasons faucets drip continuously:
Worn Rubber Washers or O-Rings
These small components create a watertight seal. Over time, they flatten, crack, or shift out of position.
Damaged Cartridge
Many modern faucets use cartridges to control water flow. When they wear out, water leaks through even when the faucet is off.
Mineral Buildup from Hard Water
Calcium deposits prevent internal components from sealing tightly.
Corroded Valve Seat
The valve seat connects the faucet to the spout. Corrosion disrupts smooth operation.
Loose Internal Parts
Years of daily use can loosen screws and fittings inside the faucet.
In my case, tightening the handle didn’t help — a clear sign the issue was internal wear.
What Finally Made Me Take Action
One night, I counted the drips.
About one every three seconds.
That’s thousands of drops per day. Enough to waste significant water over time — and enough to justify fixing it immediately.
So I gathered tools, watched a few tutorials, and decided to repair it myself.
What follows is the exact process I used.
Tools I Used for the Repair
You don’t need professional plumbing equipment.
Here’s everything I used:
- Adjustable wrench
- Flathead screwdriver
- Phillips screwdriver
- Replacement cartridge or washers
- Cloth or towel
- Small container for parts
- White vinegar for cleaning buildup
That’s it.
Step-by-Step: How I Stopped the Drip Completely
This method works for most kitchen and bathroom faucets.
Step 1: Turn Off the Water Supply
This is essential.
Look under your sink. You’ll find two shut-off valves — one for hot water and one for cold.
Turn both clockwise until fully closed.
Then open the faucet to release any remaining pressure.
Skipping this step can flood your kitchen. Always shut water off first.
Step 2: Protect the Sink Drain
Small screws are incredibly easy to lose.
I plugged the drain and placed a cloth inside the sink. This prevented parts from disappearing where I couldn’t retrieve them.
A simple step that saves major frustration.
Step 3: Remove the Faucet Handle
Most handles are secured with a hidden screw.
Check for:
- A decorative cap on top
- A small side screw
- A removable cover
Remove the screw and gently lift the handle upward.
If it feels stuck, wiggle gently — don’t force it.
Step 4: Access the Internal Mechanism
Once the handle is off, you’ll see the working parts inside.
Depending on the faucet type, you may see:
- Retaining nut
- Cartridge housing
- Stem assembly
- Rubber seals
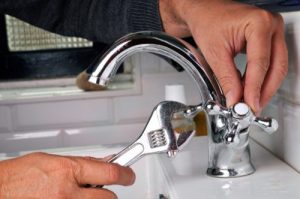
I loosened the retaining nut using an adjustable wrench and removed the cartridge.
That’s when I saw the real problem — worn edges and mineral buildup.
Step 5: Inspect the Parts Carefully
This step determines the correct fix.
Look for:
- Cracked rubber
- Flattened washers
- Rough or scratched cartridge surfaces
- White mineral deposits
- Corrosion
If parts look damaged, replacement is the best solution.
Cleaning helps temporarily, but worn parts eventually leak again.
Step 6: Buy the Correct Replacement Part
I took the old cartridge to a hardware store and matched it exactly.
Faucet parts are not universal. Even small differences matter.
Some well-known faucet manufacturers include:
- Moen
- Delta Faucet Company
- Kohler
If you know your faucet brand, finding parts is easier. If not, matching the physical piece works best.
Step 7: Clean the Faucet Housing
Before installing the new part, I cleaned everything.
Mineral buildup prevents proper sealing.
I soaked affected areas with vinegar, wiped them clean, and dried thoroughly.
This step significantly improves long-term results.
Step 8: Install the New Component
Reassembly is simple:
Insert the new cartridge or washer in the correct orientation, secure the retaining nut, and reattach the handle.
Tighten firmly but gently.
Overtightening can damage new parts.
Step 9: Restore Water and Test
Slowly reopen the shut-off valves.
Turn the faucet on and off multiple times.
Check carefully for:
- Dripping
- Handle stiffness
- Leaks at the base
When I tested mine — silence. Not a single drop.
The constant drip that had driven me crazy was completely gone.
Practical Tips That Made the Repair Much Easier
These small details helped more than I expected.
Take Photos Before Removing Parts
Your phone becomes your assembly guide.
Replace All Rubber Components at Once
If one seal failed, others are likely worn too.
Clean Mineral Deposits Thoroughly
Even small buildup affects sealing.
Organize Parts in Removal Order
This prevents confusion later.
Work Slowly and Stay Patient
Rushing causes mistakes.
Mistakes I Made (So You Don’t Have To)
Learning from my errors will save you time.
I Tightened the Handle Instead of Repairing the Cause
This only stresses internal components.
I Tried Cleaning Old Parts Instead of Replacing Them
Temporary fix. Leak returned quickly.
I Bought a Similar Cartridge Instead of an Exact Match
Close isn’t good enough.
I Skipped Cleaning Initially
Mineral buildup interfered with sealing.
Real-Life Example: How Long the Fix Lasted
After replacing my cartridge and cleaning the housing, the faucet stayed perfectly dry for years.
No dripping. No noise. No rising water bills.
Preventive care made the repair last far longer than expected.
How to Prevent Faucet Drips in the Future
After fixing mine, I wanted to avoid repeating the process.
Here’s what works:
Close Faucets Gently
Force damages seals.
Clean Mineral Deposits Regularly
Especially if you have hard water.
Replace Worn Parts Early
Small issues grow quickly.
Check Under the Sink Occasionally
Early detection prevents major problems.
When You Should Call a Professional
DIY works for most dripping faucets, but not all plumbing problems.
Call a plumber if:
- Water leaks from the faucet base
- Pipes under the sink are leaking
- Shut-off valves don’t function
- Faucet body is cracked
- Leak continues after full internal replacement
Structural plumbing issues require professional repair.
Frequently Asked Questions
Why does my faucet drip even after replacing the washer?
The cartridge may be worn, misaligned, or the valve seat may be damaged. Check all internal components carefully.
How long does it take to fix a dripping faucet?
Most repairs take 30 to 60 minutes, even for beginners.
Is a slow drip really a big problem?
Yes. Even slow leaks waste large amounts of water over time and increase utility costs.
How do I know which replacement part to buy?
Remove the old part and match it exactly at a hardware store or check the faucet model number.
Can mineral buildup alone cause dripping?
Yes. Hard water deposits can prevent internal parts from sealing properly.
Conclusion
That tiny faucet drip once felt like a never-ending annoyance. I thought fixing it would require special skills, expensive tools, or professional help.
It didn’t.
Once I understood that the problem was simply worn internal parts, the repair became straightforward and completely manageable.
The biggest lesson I learned is this:
Most faucet drips aren’t complicated plumbing failures — they’re small mechanical issues with simple solutions.
If your faucet is dripping right now, don’t ignore it. Don’t just tighten the handle. And don’t assume you need a plumber immediately.
With basic tools, the right replacement part, and a little patience, you can stop the drip yourself — and enjoy the quiet that comes with fixing the problem for good.