There’s a special kind of frustration that only a dripping faucet can create.
It’s not loud enough to be dramatic. Not urgent enough to feel like an emergency. But persistent enough to slowly test your patience… especially at night.
That’s exactly what happened to me.
At first, I barely noticed it. Just a quiet plink… plink… plink into the sink. But once I became aware of it, I couldn’t unhear it. The sound echoed in the silence of the house. It interrupted my focus while working. It even started waking me up at night.
I tried tightening the handle. I tried adjusting the position. I tried ignoring it.
Nothing worked.
After a few sleepless nights and growing irritation, I finally decided to fix it properly. What I discovered surprised me — not just how simple the repair was, but how many people live with dripping faucets far longer than they need to.
If a faucet drip is driving you crazy too, this guide walks you through exactly what I did — step by step — along with the lessons I learned so you can fix it faster and avoid common mistakes.
Why a Dripping Faucet Feels So Annoying (And Why It Matters)
Before fixing mine, I thought the problem was mostly psychological. Just an irritating sound.
But there’s more to it than that.
A dripping faucet is actually a combination of three issues:
Continuous noise exposure
Repetitive sounds trigger stress responses in the brain. Even soft dripping can increase tension over time, especially in quiet environments.
Constant water waste
Even slow drips add up to measurable water loss over weeks and months.
Underlying mechanical failure
A drip is a symptom — not the problem itself. Something inside the faucet is no longer sealing correctly.
Once I understood that the drip meant a real mechanical issue, fixing it felt less like a convenience and more like necessary maintenance.
What Causes a Faucet to Drip Continuously?
After taking my faucet apart, I realized most drips come from predictable wear and tear. Faucets are mechanical systems with moving parts, seals, and pressure control. Over time, these components degrade.
Here are the most common causes.
Worn rubber washer
This is the classic reason. A washer presses tightly to stop water flow. Years of friction flatten or crack it, allowing water to slip through.
Damaged cartridge
Many modern faucets use cartridges to regulate flow. When internal seals wear out, dripping begins even when the handle is fully closed.
Mineral buildup
Hard water leaves deposits that interfere with smooth sealing surfaces.
Loose internal components
Repeated use can loosen mounting parts, preventing proper closure.
High water pressure
Excess pressure forces water past seals that would otherwise hold.
In my case, the cause was simple: a worn-out washer that had hardened and lost flexibility.
But identifying the cause is important — because the fix depends on the specific failure.
How I Finally Fixed the Dripping Faucet (Step-by-Step)
I had zero plumbing experience when I started. If you can use a screwdriver and follow simple steps, you can do this too.
Here’s exactly what I did.
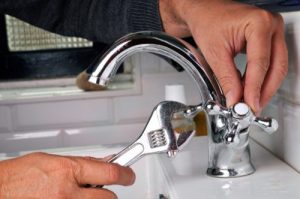
Step 1: Shut Off the Water Supply
Never skip this.
Look under your sink for two small valves connected to the pipes. Turn them clockwise to stop water flow.
Then turn the faucet on to release pressure and drain any remaining water.
This prevents unexpected sprays during disassembly.
Step 2: Prepare Your Workspace
Before opening anything, I did three things that saved time later:
- Plugged the sink drain so small parts wouldn’t fall in
- Placed a towel under the faucet to catch moisture
- Gathered tools nearby
Basic tools I used:
- Adjustable wrench
- Screwdriver
- Replacement washer
- Cloth for cleaning
That’s all.
Step 3: Remove the Faucet Handle
Most handles are secured by a screw. Sometimes it’s visible. Sometimes hidden under a decorative cap.
Once the screw is removed, the handle lifts off easily.
This exposes the internal mechanism.
Step 4: Access the Internal Valve or Cartridge
Under the handle, you’ll see a retaining nut or cover.
Unscrew it carefully to reveal the stem or cartridge.
I recommend taking a quick photo before removing anything. It makes reassembly much easier.
Step 5: Inspect the Washer or Sealing Components
This is where I found the problem.
The washer was:
- Flattened
- Slightly cracked
- Rigid instead of flexible
A healthy washer should be smooth, round, and slightly soft.
That tiny piece of rubber was the entire cause of the dripping.
Step 6: Replace the Faulty Part
I took the old washer with me to match the size exactly.
Installing the new one was simple:
- Remove old washer
- Clean the seating surface
- Insert new washer firmly
No force required. Just proper placement.
Step 7: Reassemble the Faucet
Reassembly is just reversing the steps:
- Insert stem or cartridge
- Tighten retaining nut
- Reattach handle
- Secure screw
Make sure everything is snug but not overtightened.
Step 8: Restore Water and Test
Slowly turn the water supply back on.
Then test the faucet multiple times:
- Turn on full flow
- Turn off completely
- Wait and watch
No drip. No sound. Complete silence.
After weeks of irritation, that silence felt incredibly satisfying.
How Long the Repair Actually Took
The entire process — including my first-time learning curve — took about 40 minutes.
Now that I know the steps, I could do it in under 20 minutes.
That’s all it took to eliminate weeks of annoyance.
Practical Tips That Made the Biggest Difference
These small details helped me avoid frustration.
Take photos during disassembly
Even simple faucets have multiple parts. Photos prevent confusion later.
Clean everything before installing new parts
Mineral deposits can prevent proper sealing.
Replace worn components even if they seem “almost fine”
If one part failed, others may be close behind.
Don’t overtighten the handle
Too much pressure damages seals and shortens lifespan.
Test the faucet multiple times after repair
Drips sometimes appear after pressure stabilizes.
Mistakes People Often Make (I Almost Did Too)
Avoiding these can save time and prevent repeat repairs.
Trying to stop the drip by tightening harder
This doesn’t fix worn parts. It damages them further.
Buying replacement parts without matching size
Even small size differences cause continued leaking.
Ignoring slow drips because they seem harmless
Small problems grow into bigger repairs.
Reassembling without cleaning components
Debris interferes with proper sealing.
Skipping full testing after repair
Always verify under normal usage conditions.
Real-Life Example: Why Fixing It Quickly Matters
A friend of mine ignored a dripping bathroom faucet for nearly a year.
Eventually:
- Mineral buildup worsened
- Internal corrosion developed
- The cartridge failed completely
What could have been a simple washer replacement became full faucet replacement.
Small repairs prevent expensive ones.
How to Know If Your Faucet Needs Immediate Attention
Here’s a simple check I now do monthly.
Turn the faucet fully off. Dry the spout completely. Wait one minute.
If any drop forms, sealing is compromised.
Even slow formation indicates wear.
Long-Term Prevention Habits That Keep Faucets Quiet
After fixing mine, I adopted simple habits that prevent future drips.
- Clean faucet regularly to reduce buildup
- Avoid forcing handles shut
- Replace washers every few years
- Monitor water pressure
- Respond quickly to early signs of dripping
Maintenance is easier than repair.
The Unexpected Benefit: Peace and Quiet
I expected to save water and fix a mechanical issue.
What I didn’t expect was how much mental relief came from silence.
No background irritation. No night-time dripping. No constant reminder that something was wrong.
It made the entire space feel calmer.
Frequently Asked Questions
Why does my faucet drip even when turned off tightly?
Because internal sealing components are worn or damaged. Tightening the handle cannot restore a failed seal.
Can a beginner really fix a dripping faucet?
Yes. Most faucet drips involve simple part replacement and require only basic tools.
How do I know which replacement part to buy?
Remove the worn component and match its size and shape at a hardware store. Exact matching is important.
Is it better to repair or replace an old faucet?
If corrosion is severe or parts are unavailable, replacement may be easier. Otherwise, repair is usually sufficient.
How often should faucet components be replaced?
It depends on usage and water quality, but washers and seals often need replacement every few years.
Final Thoughts: The Simple Fix That Restored My Sanity
That faucet drip seemed minor at first.
But constant small annoyances add up — in sound, stress, and wasted water. What made the biggest impression on me wasn’t just how easy the repair was, but how long I had tolerated something completely fixable.
The truth is simple:
Most dripping faucets are not complicated problems.
They are small mechanical failures waiting for basic attention.
Once I finally addressed mine, the repair was quick, inexpensive, and surprisingly satisfying. The silence that followed felt like a reward.
If a faucet drip is bothering you right now, don’t wait until it drives you crazy like mine did.
Turn off the water. Open the handle. Check the washer. Replace what’s worn.
You’ll stop the noise, stop the waste, and gain the confidence that comes from fixing something with your own hands.
And when the drip is gone, you’ll notice something wonderful:
Silence really does sound better.