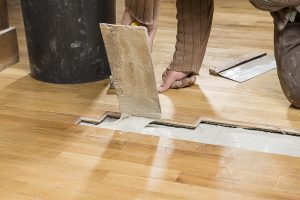
A few weeks ago, I was walking through my kitchen when I stepped on a tile that made a cracking sound. My heart sank — one of my favorite tiles had a visible chip and a small crack running across it. I immediately thought about the cost of hiring a professional or replacing the whole section of tiles. But then I remembered: sometimes, a little patience, the right materials, and a hands-on approach can fix a tile faster than you think. After some trial, error, and careful work, I repaired that damaged tile in just minutes — and it looked almost brand-new.
If you’re staring at a chipped, cracked, or scratched tile and wondering how to fix it without tearing up your floor or wall, this guide will walk you through the steps I used and the lessons I learned along the way.
Why Tiles Get Damaged
Before diving into the repair, it helps to understand why tiles get damaged in the first place. Knowing the cause helps prevent future issues and ensures the repair lasts.
Common Causes of Tile Damage
- Accidental Impact: Dropping heavy objects like pots, pans, or tools can chip or crack tiles instantly.
- Wear and Tear: High-traffic areas, especially in kitchens and bathrooms, see more foot traffic that gradually weakens tiles.
- Subfloor Movement: Sometimes, the foundation beneath tiles shifts or settles, creating stress points that lead to cracks.
- Improper Installation: If tiles were laid without the correct adhesive or grout spacing, they’re more prone to breaking.
- Temperature Changes: In bathrooms or outdoor areas, extreme temperature swings can cause ceramic or porcelain tiles to expand and crack.
In my case, a heavy pan slipped from the counter and hit the tile directly. It chipped slightly, but the crack was noticeable enough to bother me every time I walked by. The solution? A simple, fast repair that didn’t require replacing the entire tile.
Step-by-Step Guide: Repairing a Damaged Tile in Minutes
Here’s how I tackled the repair. I made sure the steps are beginner-friendly, require minimal tools, and give professional-looking results.
Step 1: Gather Your Materials
Before starting, I made a quick list of what I needed:
- Epoxy or tile repair filler (color-matched if possible)
- Putty knife or small spatula
- Fine-grit sandpaper (220–400 grit)
- Rubbing alcohol or mild cleaner
- Clean cloth
- Toothpick or small detailing tool
Having everything on hand before starting makes the repair go smoothly — nothing worse than pausing mid-fix to hunt for supplies.
Step 2: Clean the Damaged Area
The chip and crack need to be free from dust, grease, or debris for the filler to adhere properly. I cleaned the tile surface with rubbing alcohol and a clean cloth, ensuring no residue remained.
Tip: Avoid using harsh chemicals that can damage the tile’s glaze. A gentle alcohol wipe or mild soap solution works best.
Step 3: Apply the Epoxy or Filler
Once the tile was clean, I mixed a small amount of epoxy according to the manufacturer’s instructions. Many repair kits allow you to mix colors to match your tile exactly — this is key for a seamless look.
Using a putty knife, I carefully pressed the epoxy into the chip and crack. For thin cracks, a toothpick or small detailing tool works better, allowing you to push filler deep without making a mess on the surrounding tile.
Pro tip: Slightly overfill the chip. Once the epoxy dries, you can sand it down for a smooth, level finish.
Step 4: Smooth and Level the Surface
After filling, I let the epoxy cure for the time recommended on the package (usually 5–15 minutes for quick-cure epoxy). Then, I used fine-grit sandpaper to smooth the surface so it was flush with the rest of the tile.
Be gentle while sanding. The goal is to remove excess filler and blend the repaired area, not scratch the original tile.
Step 5: Clean and Polish
Finally, I wiped the repaired area with a damp cloth to remove dust. For glossy tiles, a little gentle buffing with a microfiber cloth restored the shine and made the repair almost invisible.
I stepped back and tested it with my foot — no more annoying crack, and visually, it blended perfectly with the surrounding tiles.
Practical Tips from My Experience
Through this repair, I learned a few lessons that can save time and ensure a professional result.
Tip 1: Match Colors Carefully
Color-matching is crucial. If the epoxy or filler doesn’t match your tile, the repair will stand out immediately. Many repair kits include several shades that can be mixed for a custom match.
Tip 2: Work in Small Sections
If multiple chips or cracks are present, tackle them one at a time. This keeps the epoxy from curing too quickly or becoming messy.
Tip 3: Don’t Rush the Sanding
Sand gently in circular motions. Too much pressure can scratch the original tile surface. Take your time — patience makes a huge difference.
Tip 4: Protect Surrounding Areas
I used painter’s tape around the damaged tile to prevent epoxy from spreading onto adjacent tiles. This step makes cleanup much easier.
Tip 5: Keep Small Tools Handy
Toothpicks, small spatulas, and microfiber cloths make detailed work easier. I realized that having proper tools saved me a lot of frustration.
Mistakes I Made (and Avoided Later)
Even with experience, I made a few errors the first time I tried a tile repair:
- Applying Too Little Filler: The epoxy shrank slightly during curing, leaving a small depression. Overfilling solved this issue.
- Skipping Cleaning: I tried repairing without wiping away dust first — the filler didn’t adhere well. Lesson learned: cleaning first is non-negotiable.
- Ignoring Color Matching: I initially used a filler that was slightly lighter. Blending with a color-matched epoxy made the repair invisible.
These mistakes are common, but knowing them ahead of time can prevent wasted time and frustration.
Real-Life Examples of Quick Tile Repairs
- Kitchen Chip: A small chip near the sink was repaired in 10 minutes with epoxy. Matching the beige color made it almost invisible.
- Bathroom Crack: A thin crack along a bathroom tile was fixed using a toothpick to push epoxy deep into the line. A quick sanding and buffing restored the shine.
- High-Traffic Area: Even tiles in entryways with slight scratches can be repaired quickly using the same filler method, protecting against further damage.
These examples show that most tile damage doesn’t require replacing entire sections — quick fixes can be both cost-effective and durable.
When to Consider Professional Help
While most small chips and cracks can be repaired at home, some situations warrant professional attention:
- Large Cracks or Broken Tiles: Tiles that are severely damaged may need replacement.
- Structural Issues: If multiple tiles are cracking due to subfloor movement, a professional should assess the problem.
- Porcelain or Specialized Tiles: Some materials require special adhesives or professional techniques.
For most standard ceramic or porcelain tiles, however, the DIY method I used is fast, affordable, and effective.
Preventing Future Tile Damage
Once your tile is repaired, it’s wise to take steps to protect it from future chips or cracks:
- Use Protective Pads: Place pads under furniture or heavy appliances to avoid scratching tiles.
- Clean Carefully: Avoid dropping heavy objects and wipe up spills to prevent slipping accidents.
- Avoid Sharp Impacts: Be mindful of dropped utensils or tools, especially on ceramic kitchen tiles.
- Monitor Subfloor Movement: If your home is older, check for settling that may stress tiles over time.
Regular maintenance extends the life of your floors and walls, keeping them beautiful and functional.
FAQs
Q1: Can I repair a tile without removing it?
Yes, minor chips and cracks can be fixed using epoxy or tile repair filler, without removing the tile.
Q2: How long does a quick tile repair last?
With proper cleaning, color matching, and smoothing, the repair can last for years, especially in low-traffic areas.
Q3: What’s the best filler for small tile chips?
Epoxy or acrylic-based tile repair kits are ideal. Choose a kit that allows color mixing to match your tile.
Q4: Can this method work on wall tiles?
Absolutely. Chips, cracks, and small scratches on wall tiles can be repaired using the same techniques.
Q5: Is sanding necessary?
Yes, sanding ensures the repaired area is flush with the rest of the tile, blending it seamlessly.
Conclusion
Repairing a damaged tile doesn’t have to be expensive, time-consuming, or stressful. With a little patience, the right materials, and careful attention to detail, I was able to fix my chipped kitchen tile in minutes. By cleaning the area, applying a color-matched epoxy, gently sanding, and polishing, I restored the tile’s look and function.
From my experience, small repairs like this are empowering — not only do they save money, but they also prevent further damage and maintain the beauty of your home. Next time a tile chips, cracks, or scratches, don’t panic. With these steps, you can handle it yourself, quickly and efficiently.