I still remember the exact moment I noticed something was wrong.
It wasn’t a dramatic flood or a loud drip echoing through the kitchen. It was quieter than that. Subtle. Sneaky. The kind of problem that slowly grows while you’re busy living your life.
One morning, I wiped my kitchen counter and felt a strange rough patch near the base of the faucet. The laminate looked swollen. The color was slightly darker. When I pressed it gently, it felt soft.
That’s when my stomach dropped.
Water damage.
And not just a tiny splash — my faucet had been leaking long enough to ruin part of the counter.
If you’re dealing with the same situation, I understand the mix of frustration, panic, and confusion. Is the counter repairable? Is the leak serious? How expensive will this be? Where do you even start?
I went through all of it. And I fixed it.
This guide explains exactly what happened, what I learned, and the practical step-by-step process I used to stop the leak and repair the damage before it got worse.
Understanding How a Small Faucet Leak Can Destroy a Counter
Before this happened to me, I thought faucet leaks were obvious — dripping water, visible puddles, annoying sounds.
But many leaks are hidden and slow. That’s what makes them dangerous.
Here’s what typically happens.
Water sneaks under the faucet base
Most kitchen faucets sit on top of a sealed surface. Over time, the seal breaks down. Water from normal use seeps underneath.
Moisture gets trapped
Water can’t evaporate easily once it slips under the fixture. It stays there, soaking into wood, particleboard, or laminate.
Materials begin to swell and rot
Counters made from composite materials absorb moisture quickly. They expand, soften, and eventually break down.
Mold can develop
Warm, damp, dark spaces are perfect for mold growth. That can create health concerns and structural damage.
In my case, the leak wasn’t from the faucet spout. It was from the base gasket — a hidden failure I never noticed until the counter started deteriorating.
Signs Your Faucet Leak Is Damaging Your Counter
If you want to catch this problem early, watch for these warning signs. I missed a few of them at first.
- Counter surface feels soft near faucet
- Bubbling, swelling, or lifting laminate
- Discoloration or dark rings around fixture
- Musty smell near sink area
- Water appearing under sink without clear source
- Faucet base feels loose or shifts slightly
If you notice even one of these, don’t wait. Water damage spreads faster than most people expect.
Step-by-Step: How I Stopped the Leak and Saved My Counter
This is the exact process I followed. You don’t need professional plumbing experience. Just patience and basic tools.
Step 1: Turn Off the Water Supply Immediately
This is the first and most important step.
Look under your sink and find the shutoff valves connected to the faucet lines. Turn them clockwise until fully closed.
Then turn on the faucet to release any remaining pressure.
Stopping water flow prevents further damage while you work.
Step 2: Dry Everything Completely
Before fixing anything, remove all moisture.
I used:
- Paper towels for surface water
- A dry cloth for tight areas
- A fan pointed at the counter for several hours
If the area is very wet, use a hair dryer on low heat. Keep it moving to avoid damaging surfaces.
Drying is critical. Sealing moisture inside the counter can make damage worse later.
Step 3: Inspect the Source of the Leak
This step helped me understand what failed.
Check three common leak points:
Faucet base seal
Water collects around the fixture and seeps underneath.
Supply line connections
Loose or worn fittings drip slowly.
Cartridge or internal components
Leaks inside faucet body travel down to base.
In my case, the base seal had completely deteriorated. Water from daily handwashing had been slipping underneath for months.
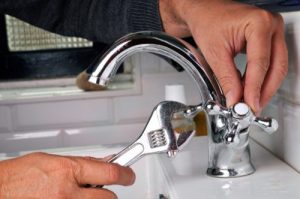
Step 4: Remove the Faucet
This part sounds intimidating, but it’s manageable.
Here’s what I did:
- Disconnect water supply lines
- Unscrew mounting nuts under sink
- Lift faucet straight up
Once removed, I could clearly see the damage underneath — damp wood and broken sealant.
Step 5: Clean the Surface Thoroughly
Old sealant, grime, and moisture must be removed.
I scraped off residue carefully with a plastic scraper. Then wiped the surface with rubbing alcohol to clean and disinfect.
This step ensures the new seal bonds properly.
Step 6: Repair the Damaged Counter Area
The repair method depends on severity.
If damage is mild (like mine)
- Remove soft material with a small tool
- Let area dry completely
- Fill with waterproof wood filler or epoxy
- Sand smooth after curing
If damage is severe
The affected section may need partial replacement. If the structure is crumbling or mold is extensive, professional help is best.
Luckily, my damage was moderate and repairable.
Step 7: Reseal the Faucet Base Properly
This step prevents the problem from returning.
I applied a continuous bead of waterproof silicone sealant around the faucet opening. Not too much, but enough to create a full barrier.
Then I reinstalled the faucet firmly.
After tightening everything, I wiped away excess sealant for a clean finish.
Step 8: Restore Water and Test Carefully
Turn water supply back on slowly.
Then test the faucet for several minutes while checking:
- Base area
- Under sink connections
- Counter surface
No moisture should appear anywhere.
I also checked again the next day just to be safe.
What I Learned the Hard Way (Important Tips)
These lessons would have saved me time, money, and stress.
Check around your faucet weekly
Just a quick wipe and press test can reveal early swelling.
Prevention takes seconds. Repairs take hours.
Never ignore small leaks
Slow leaks cause the worst structural damage because they stay hidden longer.
Even tiny moisture patterns matter.
Replace sealant every few years
Silicone doesn’t last forever. Temperature changes, cleaning chemicals, and movement break it down.
Resealing is cheap insurance.
Tighten mounting hardware occasionally
A loose faucet allows water to slip underneath more easily.
Use waterproof materials when repairing
Regular filler absorbs moisture again. Always choose waterproof products.
Dry thoroughly before sealing
This is one of the biggest mistakes people make. Trapped moisture leads to mold and deeper rot.
Common Mistakes That Make Counter Damage Worse
I almost made several of these.
Sealing over wet wood
This locks moisture inside and accelerates decay.
Ignoring hidden underside damage
Always inspect beneath the sink.
Using household glue instead of proper sealant
Glue is not waterproof.
Reinstalling faucet loosely
Movement breaks the seal again quickly.
Waiting too long to act
Water damage spreads quietly but relentlessly.
Real Example: How Fast Damage Can Spread
After fixing my counter, I helped a friend who had a similar issue but ignored it for months.
Their situation involved:
- Fully swollen laminate surface
- Black mold growth underneath
- Structural weakening of cabinet top
The repair required replacing an entire section of countertop.
What took me an afternoon cost them several hundred dollars.
Timing makes all the difference.
How Much My Repair Cost
Here’s what I spent:
- Silicone sealant
- Waterproof filler
- Sandpaper
- Cleaning supplies
Total cost was less than a typical service call.
The biggest investment was time and patience.
Long-Term Prevention Plan I Now Follow
I never want to deal with this again, so I do these regularly:
Monthly quick inspection
Annual reseal check
Immediate tightening if faucet moves
Immediate action if moisture appears
These small habits prevent major repairs.
Frequently Asked Questions
Can a small faucet leak really damage a countertop?
Yes. Slow leaks are especially dangerous because they remain unnoticed while continuously soaking the material.
How do I know if my counter is beyond repair?
If the structure crumbles when pressed, smells strongly of mold, or spreads far beyond the faucet area, replacement may be necessary.
Is resealing a faucet difficult for beginners?
No. With basic tools and patience, most homeowners can do it safely.
What type of sealant works best around a faucet?
Waterproof silicone designed for kitchens and bathrooms provides strong, flexible sealing.
How long should I wait before using the sink after resealing?
Typically 24 hours, but always follow the sealant manufacturer’s curing time instructions.
Final Thoughts:
A leaking faucet seems small — until it isn’t.
Water doesn’t need force to cause damage. It only needs time.
What started as a barely noticeable leak turned into structural counter damage, repair work, and a stressful learning experience. But fixing it taught me something valuable: most home problems are manageable if you act early and approach them step by step.
If your faucet is leaking or your counter feels even slightly swollen, don’t ignore it. Turn off the water. Inspect the area. Dry everything. Reseal properly.
You don’t need to be a professional to stop water damage — you just need awareness and timely action.
Fixing my counter wasn’t just about repair. It was about preventing future damage, protecting my home, and learning how small maintenance habits save major expenses.
And now, every time I wipe my kitchen counter, I check around the faucet.