I noticed the crack while cleaning one afternoon. It ran diagonally across the wall, thin but obvious once you saw it. And of course, once I saw it… I couldn’t unsee it.
At first, I did what most people do. I searched online and found two types of advice:
Either ignore it
Or redo the entire wall
Neither option felt right.
Redoing the wall meant sanding, repainting large sections, moving furniture, and turning my living space into a dusty mess. Ignoring it meant watching that crack slowly ruin the look of the room.
I wanted a third option.
So I experimented, learned proper repair techniques, fixed the crack carefully, and blended it so well that even I struggle to find where it used to be.
No wall redo. No major mess. No professional help.
Just a clean, simple repair that lasted.
If you have a crack in your wall and want a proper fix without repainting everything, this guide shows exactly what worked for me.
Why I Didn’t Want to Redo the Whole Wall
Most wall repair advice assumes large damage. But many cracks are small, localized, and stable.
Redoing the entire wall for a small crack is like repainting a whole car because of one scratch.
Here’s why I avoided full wall repair:
It wastes time
It costs more than necessary
It creates unnecessary dust and disruption
Color matching large areas is harder
Small repairs can look invisible when done correctly
The key is repairing the crack properly and blending the surface, not covering everything.
Understanding the Type of Crack I Had
Before fixing anything, I needed to understand the crack.
This step matters because different cracks need different solutions.
Mine was:
Thin and narrow
Not spreading
No bulging around it
Surface-level in plaster
Located near a corner
Stable for weeks
That told me it was cosmetic, not structural.
Common harmless causes include:
Natural house settling
Minor temperature expansion and contraction
Drying or shrinkage of plaster
Previous paint stress
Small movement around joints
If a crack is wide, growing, or affecting doors or floors, that’s different. But small stable cracks are usually safe to repair directly.
The Biggest Mistake People Make When Patching Cracks
I almost made this mistake myself.
Simply filling the crack and painting over it.
That seems logical, but it often fails.
Why?
Because cracks are not just surface lines. They’re tiny separations. If you only cover the top, the crack reappears through the paint.
A lasting repair requires bonding, reinforcement, and blending.
Once I understood that, the repair worked perfectly.
Tools and Materials I Used
Nothing complicated. Everything was easy to find.
Flexible wall filler
Putty knife
Fine sandpaper
Small brush or cloth
Primer
Matching wall paint
Optional small artist brush for blending
That’s it.
No heavy equipment. No special tools.
Step-by-Step: How I Patched the Crack Without Redoing the Wall
This is the exact process that made the repair invisible and permanent.
Step 1: Clean the Crack Thoroughly
Dust and loose paint prevent proper bonding.
I used a soft brush and gently cleaned along the crack. Then I wiped the area with a dry cloth.
Clean surfaces create strong repairs.
Step 2: Slightly Open the Crack Surface
This sounds strange, but it’s essential.
Very thin cracks don’t allow filler to enter deeply. So I gently ran the edge of a scraper along the crack to widen the surface slightly.
Not deep. Just enough for filler to grip.
This prevents future reappearance.
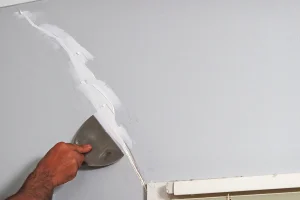
Step 3: Apply Flexible Filler Correctly
I pressed filler firmly into the crack using a putty knife.
The goal is full penetration, not just surface coverage.
Then I smoothed the area flat, blending the edges outward slightly so no ridge remained.
Thin layers work best.
Step 4: Let It Dry Completely
Patience matters here.
If you sand or paint too early, the repair weakens or shrinks unevenly.
I let mine dry overnight.
Step 5: Sand Until Perfectly Smooth
This is where the repair starts disappearing.
Using fine sandpaper, I gently smoothed the area until it felt completely level with the wall.
No bumps. No edges.
When you run your hand over it, it should feel like untouched wall.
Step 6: Spot Prime Only the Repair Area
This is the secret to avoiding full wall repainting.
Primer seals the repaired patch so paint absorbs evenly.
Without primer, repaired spots often look dull or shiny.
I applied a small amount just over the patch.
Step 7: Blend Paint Instead of Repainting the Wall
Instead of painting a large section, I blended carefully.
I used the original wall paint and applied thin layers outward from the repair area.
Then I feathered the edges so the new paint faded naturally into the old paint.
Good lighting helps here.
Once dry, the repair vanished.
The Result: Completely Invisible Repair
After everything dried, I stepped back and checked from multiple angles.
No line. No color difference. No texture change.
Even in direct sunlight, the repair blended perfectly.
Months later, the crack never returned.
That confirmed the repair was both cosmetic and structurally stable.
How to Match Paint Without Repainting the Whole Wall
This is where many people struggle.
Here’s what worked for me:
Use leftover original paint if possible
Stir paint thoroughly before using
Apply thin coats
Blend edges gradually
Work in natural light
Allow drying between layers
If the wall is older and slightly faded, blending is more important than exact color matching.
Practical Tips That Made My Repair Look Professional
Repair in good lighting so you can see surface texture clearly
Always sand more gently than you think necessary
Use flexible filler for hairline cracks
Blend paint outward, never stop at a hard edge
Keep repair areas small and controlled
Check the wall from different viewing angles
Take your time during smoothing and blending
The smoother the surface, the easier the paint match.
Mistakes I Avoided (And You Should Too)
Rushing drying time
Using thick filler layers
Skipping primer
Painting too large an area unnecessarily
Using coarse sandpaper
Ignoring surface texture differences
Applying paint too heavily
Most visible repairs happen because of texture mismatch, not color mismatch.
Real Example: Repairing a Crack Near My Door Frame
The crack near my door frame worried me most because it was in a high-visibility area.
After repairing it using the same method:
The patch disappeared completely
No repainting of the full wall
No visible transition lines
No reappearance after months
Corners and edges can be repaired just as successfully with careful blending.
How Long the Entire Repair Took
Actual working time was short:
Cleaning and preparation — 15 minutes
Filling — 10 minutes
Sanding — 10 minutes
Priming — 5 minutes
Painting — 15 minutes
Most time was waiting for drying.
In one day, the wall looked new again.
When You Should Not Use This Method
This method works for cosmetic cracks only.
Do not patch directly if:
Crack keeps growing
Wall bulges
Multiple cracks form patterns
Doors or windows stick
Crack is wide or deep
Those signs suggest structural movement.
Frequently Asked Questions
1. Can I patch a crack without repainting the whole wall?
Yes. If the crack is small and stable, careful blending allows a seamless repair without full repainting.
2. Will patched cracks come back?
If repaired properly with flexible filler and stable wall conditions, they usually do not return.
3. How do I hide repair marks after painting?
Smooth sanding, primer application, and feathered paint blending prevent visible patch marks.
4. Is filler alone enough to fix a crack?
Filler works when applied deeply and properly prepared. Surface-only coverage fails.
5. How do I know if a crack is safe to patch?
If it is thin, stable, and not growing, it is usually cosmetic and safe to repair.
Final Thoughts — Small Repairs Done Right Save Time, Money, and Stress
When I first saw that crack, I thought fixing it meant repainting the entire wall or calling a professional.
Neither was necessary.
With proper preparation, the right materials, and careful blending, I repaired the crack completely without disturbing the rest of the wall.
The biggest lesson I learned is simple:
You don’t need big solutions for small problems.
If the crack is cosmetic and stable, a precise, controlled repair works better than major wall work.
Take your time. Prepare carefully. Blend patiently.
Done right, the crack disappears — and so does the worry that came with it.