It started as a tiny sound I thought I could ignore.
Drip… pause… drip… pause…
At first, it blended into the background noise of daily life. But late at night, when everything else was quiet, that sound took over the entire kitchen. It felt louder than it actually was. Irritating. Persistent. Impossible to ignore.
One night, I counted.
One drip every 4 seconds.
That’s more than 20,000 drips a day. Suddenly, I wasn’t just annoyed. I was thinking about wasted water, higher utility bills, and the possibility that something worse might be happening inside the faucet.
So I did what most people do — I tightened the handle harder.
It didn’t help.
The drip continued.
That’s when I decided to stop ignoring it and actually fix the problem myself. What I discovered surprised me: repairing a dripping kitchen faucet is far easier than most people think.
If you’re dealing with the same issue, I’ll walk you through exactly what I did — step by step — including mistakes I made, what actually worked, and what you should do differently to save time.
Why Kitchen Faucets Start Dripping in the First Place
Before I grabbed any tools, I needed to understand the cause.
A dripping faucet is almost never random. It’s usually caused by normal wear and tear inside the faucet mechanism.
Here are the most common reasons:
1. Worn-Out Washer or O-Ring
Inside many faucets are rubber or silicone parts that seal water flow. Over time, they compress, crack, or shift. Once that seal weakens, water sneaks through — drip by drip.
This is the number one cause in compression-style faucets.
2. Damaged Cartridge
Modern faucets often use cartridges instead of washers. If the cartridge becomes worn or clogged with mineral buildup, it won’t seal properly.
3. Loose or Corroded Valve Seat
The valve seat connects the faucet to the spout. Mineral deposits or corrosion can prevent a tight seal.
4. Water Pressure Issues
Sometimes pressure inside the pipes pushes water through even when the faucet is off. This is less common but possible.
5. Age and Mineral Buildup
Hard water slowly coats internal parts with calcium deposits. Over time, moving components stop sealing tightly.
In my case, the problem turned out to be a worn cartridge — but I didn’t know that yet.
How I Fixed My Dripping Kitchen Faucet (Step-by-Step)
This is exactly the process I followed — simple, beginner-friendly, and doable in under an hour.
Step 1: Turn Off the Water Supply
This is essential.
Look under your sink. You’ll find two shut-off valves:
- One for hot water
- One for cold water
Turn both clockwise until tight.
Then open the faucet to release remaining pressure. A little water may come out — that’s normal.
Skipping this step can flood your kitchen. Ask me how I know. Always shut the water off first.
Step 2: Plug the Sink Drain
Small screws love disappearing into drains.
I used a sink plug and also placed a cloth over the opening for extra safety. This saved me from crawling under cabinets searching for tiny parts later.
Step 3: Identify Your Faucet Type
This matters because each type opens differently.
Common kitchen faucet types include:
- Compression faucets (two handles, older style)
- Cartridge faucets (single handle, smooth movement)
- Ball faucets
- Ceramic disc faucets
Mine was a single-handle cartridge faucet, which is common in modern kitchens.
If you’re unsure, search your faucet model online or take a photo before disassembling.
Step 4: Remove the Faucet Handle
This part took me a few minutes to figure out.
Many handles have a small decorative cap hiding a screw. Carefully pry it off using a flat screwdriver or knife edge.
Then remove the screw and lift the handle straight up.
If it feels stuck, don’t force it. Gently wiggle it side to side.
Step 5: Remove the Cartridge or Internal Parts
Once the handle is off, you’ll see the inner mechanism.
Depending on your faucet, you may need to remove:
- A retaining nut
- A clip
- A collar
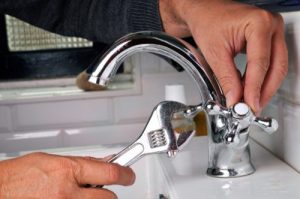
I used an adjustable wrench to loosen the retaining nut. Then I pulled the cartridge straight out.
Mine looked worn and slightly rough — clear evidence it needed replacement.
Step 6: Take the Old Part to a Hardware Store
This step saved me from buying the wrong replacement.
I took the old cartridge with me and matched it exactly. Faucet parts are not one-size-fits-all.
Some common faucet manufacturers include:
- Moen
- Delta Faucet Company
- Kohler
If you know your faucet brand, replacements are even easier to find.
Step 7: Install the New Cartridge
Installation was simple:
- Align the cartridge correctly
- Push it fully into place
- Reattach the retaining nut
- Reinstall the handle
Make sure everything sits firmly and straight.
Step 8: Turn Water Back On and Test
I slowly reopened the shut-off valves.
Then I turned the faucet on and off several times.
Silence.
No drip.
After weeks of irritation, the kitchen was finally quiet again.
Practical Tips That Made the Repair Much Easier
These small details made a big difference.
Take Photos During Disassembly
Before removing parts, snap photos. Reassembly becomes much easier.
Clean Mineral Deposits
If you see white buildup, soak parts in vinegar before reinstalling.
Replace All Rubber Parts at Once
Even if only one washer looks worn, replacing everything prevents future leaks.
Don’t Overtighten
Too much force can damage seals or crack components.
Keep Basic Tools Ready
You’ll typically need:
- Adjustable wrench
- Screwdriver
- Replacement cartridge or washer
That’s it.
Mistakes I Made (So You Don’t Have To)
Learning from my errors will save you time.
I Assumed Tightening the Handle Would Fix It
It doesn’t. Internal parts cause most drips.
I Forgot to Check Water Supply First
I nearly started disassembly before shutting water off.
Always turn water off first.
I Tried Cleaning the Old Cartridge Instead of Replacing It
Cleaning helped temporarily, but the drip returned. Replacement is the real fix.
I Bought the Wrong Replacement Part Initially
Taking the old part to the store avoids this.
How Much Money This Saved Me
Calling a plumber in my area would have cost roughly:
- Service call fee
- Labor charge
- Replacement parts
Estimated total: significant cost for a simple repair.
My actual cost:
- Replacement cartridge
- 45 minutes of my time
The savings alone made the effort worth it.
When You Should Call a Professional Instead
DIY works in most cases, but not always.
Call a plumber if:
- The faucet base is leaking
- Pipes under the sink are dripping
- You can’t remove stuck components
- Water pressure problems affect the whole house
- The faucet is severely corroded
Structural plumbing issues require professional help.
How to Prevent Faucet Dripping in the Future
After fixing mine, I wanted to avoid repeating the process soon.
Here’s what helps:
Don’t Slam the Faucet Shut
Gentle closing reduces wear on internal seals.
Clean Mineral Buildup Regularly
Hard water accelerates damage.
Install a Water Softener (If Needed)
Especially helpful in areas with mineral-heavy water.
Replace Worn Parts Early
Small issues grow quickly if ignored.
Real Example: How Long the Fix Lasted
After replacing my cartridge, the faucet stayed perfectly dry for years.
No leaks. No drips. No strange sounds.
Preventive care and occasional cleaning made all the difference.
Frequently Asked Questions
Why does my faucet drip even after replacing the washer?
The problem may be the valve seat, cartridge alignment, or mineral buildup. Inspect all internal components carefully.
How long does it take to fix a dripping kitchen faucet?
Most repairs take 30 to 60 minutes, even for beginners.
Is a dripping faucet dangerous or just annoying?
It can waste significant water and increase bills. Long-term leaks may also cause corrosion or mold.
How do I know which replacement part to buy?
Remove the old part and match it exactly at a hardware store or check the faucet model number.
Can I fix a dripping faucet without tools?
Usually no. At minimum, you’ll need a screwdriver and wrench.
Conclusion
Fixing my dripping kitchen faucet felt intimidating at first — but once I understood the cause, the repair was surprisingly simple.
No advanced skills. No expensive equipment. Just patience and the right replacement part.
The biggest lesson I learned is this:
A dripping faucet is rarely a major plumbing disaster — it’s usually a small internal part asking to be replaced.
If you’re listening to that constant drip right now, don’t ignore it. With a little time and effort, you can fix it yourself and enjoy the silence again.
And trust me — once that dripping stops, your kitchen feels instantly calmer.