Introduction: The Day I Noticed the Crack That Wouldn’t Go Away
I still remember the moment I spotted a thin crack running across my bedroom wall. At first, I ignored it. “It’s just paint,” I told myself. But within a few weeks, that tiny line grew wider—and suddenly, it wasn’t just an eyesore. It started to feel like something was wrong with the house itself.
If you’re dealing with wall cracks, you’re probably wondering the same thing I did:
-
Is this serious?
-
Can I fix it myself?
-
Will it come back?
The truth is, most wall cracks are fixable—and many of them don’t require professional help. But the key is knowing what type of crack you’re dealing with and how to repair it properly.
Let’s break it down in a simple, practical way.
Understanding Wall Cracks: What They Really Mean
Not all cracks are the same—and treating them the same way is a common mistake.
1. Hairline Cracks (Surface-Level)
These are thin, shallow cracks that usually affect only the paint or plaster.
Causes:
-
Normal settling of the building
-
Temperature changes
-
Poor paint application
👉 These are usually harmless and easy to fix.
2. Shrinkage Cracks
These appear as plaster dries and shrinks over time.
Where you’ll see them:
-
Newly constructed homes
-
Recently plastered walls
👉 Not dangerous, but they need proper filling.
3. Structural Cracks (Serious Ones)
These are wider, deeper, and may grow over time.
Warning signs:
-
Cracks wider than 3mm
-
Diagonal cracks near doors/windows
-
Reappearing cracks after repair
👉 These may indicate foundation or structural issues.
Step-by-Step Wall Crack Repair (Beginner-Friendly)
Let’s go through the exact process I used to fix cracks in my own home.
Step 1: Inspect the Crack Carefully
Before fixing anything, understand what you’re dealing with.
Check:
-
Width and depth
-
Location (wall, ceiling, near windows)
-
Whether it’s growing
👉 If the crack is large or spreading, consider expert advice.
Step 2: Clean the Crack Area
This step is often skipped—but it’s crucial.
What to do:
-
Use a brush or cloth to remove dust and loose material
-
Slightly widen the crack using a scraper (this helps filler stick better)
Why it matters:
If you skip cleaning, the repair won’t last.
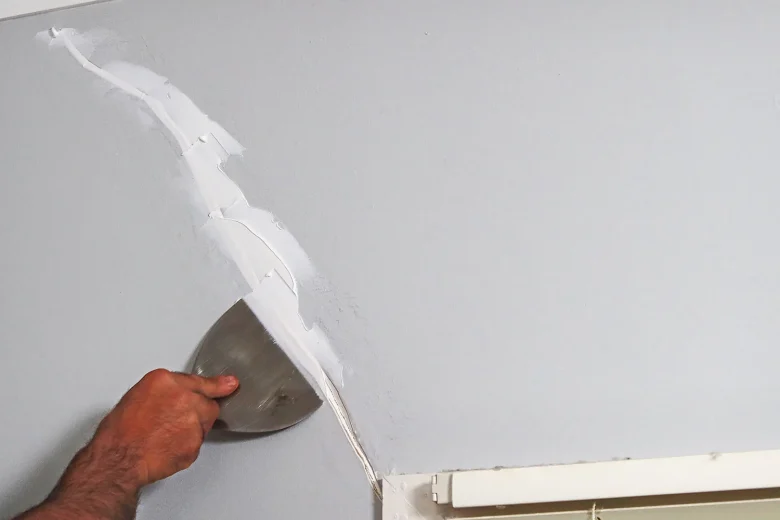
Step 3: Apply Crack Filler or Putty
Now comes the actual repair.
Materials you can use:
-
Wall putty
-
Crack filler paste
-
Plaster of Paris (POP) for small cracks
How to apply:
-
Use a putty knife
-
Press filler deep into the crack
-
Smooth the surface evenly
Let it dry completely before moving on.
Step 4: Sand the Surface Smooth
Once the filler dries:
-
Use sandpaper to level the surface
-
Make sure it blends with the wall
👉 This step ensures your repair doesn’t show after painting.
Step 5: Apply Primer
Primer helps seal the repair and prepares it for paint.
-
Use a small brush or roller
-
Apply a thin, even coat
Step 6: Repaint the Area
Finally, paint over the repaired section.
Pro Tip:
-
Use the same paint color and finish
-
For best results, repaint the entire wall if the patch is visible
Fixing Different Types of Cracks
Hairline Cracks
-
Use wall putty or filler
-
No need for heavy repair
Medium Cracks
-
Clean and widen slightly
-
Use stronger filler or POP
-
Sand and repaint
Large Cracks
-
Fill in layers
-
Use mesh tape for reinforcement
-
Consider professional help if recurring
Practical Tips That Make Repairs Last Longer
These are things I learned after my first repair didn’t hold up.
✔ Fix the Root Cause
If moisture or movement caused the crack, address it first.
✔ Use Quality Materials
Cheap fillers may crack again within months.
✔ Don’t Rush Drying Time
Let each layer dry fully before the next step.
✔ Avoid Overfilling
Too much filler can create uneven surfaces.
Common Mistakes to Avoid
❌ Painting Over Cracks Without Fixing Them
This only hides the problem temporarily.
❌ Ignoring Moisture Issues
Damp walls will keep cracking if not treated.
❌ Skipping Primer
Without primer, paint may not stick properly.
❌ Using the Wrong Material
Not all fillers are suitable for every crack type.
Real-Life Example: What Worked for Me
In my case, I had a long crack above a door frame. I initially filled it quickly and painted over it—but within two weeks, it reappeared.
The second time, I did it properly:
-
Cleaned and widened the crack
-
Used a strong filler
-
Added mesh tape for support
-
Sanded and repainted
That repair has held up ever since.
👉 Lesson learned: quick fixes don’t last—proper repairs do.
When You Should Call a Professional
Some cracks shouldn’t be handled alone.
Call an expert if:
-
Cracks are wider than 3mm
-
They keep coming back
-
You notice sloping floors or sticking doors
-
Cracks appear suddenly after heavy rain or construction nearby
Safety always comes first.
FAQs: Real Questions People Ask
1. Are wall cracks dangerous?
Most small cracks are harmless, but large or growing cracks can indicate structural issues.
2. Can I fix wall cracks myself?
Yes, small and medium cracks can be repaired easily with basic tools and materials.
3. Why do cracks come back after repair?
Usually due to poor preparation, low-quality materials, or unresolved underlying issues.
4. What is the best filler for wall cracks?
Wall putty or ready-made crack fillers work best for most household repairs.
5. Should I paint immediately after filling cracks?
No, always wait until the filler is completely dry and apply primer first.
Conclusion: Fix It Right, Fix It Once
Wall cracks can be worrying—but they don’t have to be complicated.
The key is simple:
-
Identify the type of crack
-
Use the right method
-
Don’t skip important steps
From my own experience, taking a little extra time to repair cracks properly saves you from repeating the same job again and again.
Start with the basics, be patient, and your walls will look as good as new.
And most importantly—don’t ignore cracks. Small problems are always easier to fix than big ones.