A dripping faucet might seem like a small problem at first. One drop… then another… then another. But if you’ve ever tried to sleep in a quiet house while a faucet keeps dripping in the background, you know how annoying it can become.
I remember dealing with this exact issue in my kitchen. At first, I ignored it, thinking it wasn’t a big deal. But after a few days, the constant drip started driving me crazy. Then I learned something surprising: a single leaky faucet can waste thousands of liters of water every year.
That’s when I decided to fix it myself.
The good news is that most faucet leaks are easy to repair, even if you have zero plumbing experience. In this guide, I’ll walk you through practical leaky faucet fixes, explain why faucets leak, and show you simple step-by-step solutions you can try at home.
Why Faucets Start Leaking
Before fixing a faucet, it helps to understand what causes the leak. In many cases, the issue is simply a worn-out part that needs replacing.
Here are the most common causes.
1. Worn-Out Washer
Inside many faucets is a small rubber washer that seals the valve.
Over time, washers wear down due to:
-
Friction
-
Water pressure
-
Age
When this happens, water slips through and causes dripping.
2. Damaged O-Ring
An O-ring is a small rubber ring that helps seal the faucet handle.
When the O-ring becomes loose or cracked, leaks often appear around the faucet handle.
3. Corroded Valve Seat
The valve seat connects the faucet to the spout. Mineral buildup or corrosion can damage this part and cause leaks.
This issue is more common in areas with hard water.
4. Loose Parts
Sometimes the problem is simply a loose component inside the faucet.
Daily use can slowly loosen screws or fittings, allowing water to escape.
Step-by-Step Leaky Faucet Fixes
When I fixed my own dripping faucet, I realized that the process is much simpler than it sounds. Most repairs take 30–60 minutes and require only basic tools.
Let’s go through the steps.
Step 1: Turn Off the Water Supply
Before doing anything, turn off the water supply.
Most sinks have two shut-off valves underneath:
-
One for hot water
-
One for cold water
Turn both clockwise to shut them off.
Then open the faucet to release any remaining water in the pipes.
This step prevents unwanted flooding during repair.
Step 2: Plug the Drain
This may seem like a small step, but it’s incredibly important.
Use a sink plug or cloth to block the drain.
Small parts like screws and washers can easily fall into the drain while you’re working.
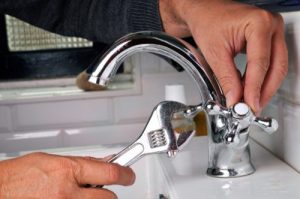
Step 3: Remove the Faucet Handle
Most faucet handles are held by a small screw.
You may need to:
-
Remove a decorative cap
-
Use a screwdriver or Allen key
Once the screw is removed, gently lift the handle off.
Inside, you’ll see the main faucet components.
Step 4: Inspect the Washer and O-Ring
This is where most leaks originate.
Check for:
-
Cracked washers
-
Flattened rubber seals
-
Damaged O-rings
If they look worn out, replacing them usually solves the problem.
Replacement washers are inexpensive and widely available at hardware stores.
Step 5: Replace the Faulty Parts
Take the damaged washer or O-ring with you to the store to ensure you get the correct size.
Install the new part in the same position as the old one.
Make sure everything fits tightly before reassembling the faucet.
Step 6: Reassemble the Faucet
After replacing the worn parts:
-
Reattach the faucet handle
-
Tighten the screws
-
Remove the drain plug
-
Turn the water supply back on
Now test the faucet.
If the drip is gone, your repair was successful.
Fixing Different Types of Faucets
Not all faucets are designed the same. Knowing your faucet type helps choose the right repair method.
Compression Faucets
These are common in older homes.
They have separate hot and cold handles and often leak due to worn washers.
Replacing the washer usually fixes the issue.
Cartridge Faucets
These faucets use a cartridge inside the handle to control water flow.
If they start leaking, the entire cartridge may need replacement.
The process is still simple and usually requires only basic tools.
Ball Faucets
Ball faucets are common in kitchen sinks.
They contain a ball mechanism that controls water flow.
Leaks often come from worn seals or springs inside the faucet.
Repair kits are available for these models.
Ceramic Disc Faucets
These are modern faucets that use ceramic discs instead of rubber washers.
They are very durable but may leak due to:
-
Dirt buildup
-
Damaged seals
Cleaning or replacing the seals typically solves the problem.
Practical Tips for Preventing Faucet Leaks
After repairing a few faucets in my house, I learned that preventing leaks is much easier than fixing them.
Here are some habits that help extend faucet life.
Avoid Over-Tightening the Handle
Many people turn the faucet handle too hard when closing it.
This compresses the washer unnecessarily and shortens its lifespan.
Turn the handle gently until water stops.
Clean Mineral Deposits
Hard water leaves mineral buildup inside faucets.
Regularly cleaning faucet aerators helps prevent internal damage.
You can soak them in vinegar to remove deposits.
Replace Small Parts Early
If you notice a small drip starting, don’t wait.
Replacing a washer early costs almost nothing and prevents bigger repairs later.
Install a Water Filter
If your home has hard water, installing a filter or softener can reduce mineral damage inside plumbing fixtures.
Common Mistakes to Avoid
When repairing a leaky faucet for the first time, a few mistakes can make the process harder.
Learning from these can save time and frustration.
Forgetting to Turn Off Water
This mistake can turn a small repair into a messy situation.
Always shut off the water before disassembling the faucet.
Using the Wrong Replacement Parts
Washers and O-rings come in many sizes.
Using the wrong size can cause continued leaking.
Always match the old part exactly.
Over-Tightening Screws
Too much force can damage faucet components.
Tighten parts securely but gently.
Ignoring Hidden Leaks
Sometimes water leaks around the base of the faucet instead of the spout.
This usually indicates a worn base gasket or O-ring.
When You Should Call a Plumber
While many faucet repairs are DIY-friendly, certain situations require professional help.
Consider calling a plumber if:
-
The faucet continues leaking after repairs
-
Pipes under the sink are leaking
-
The faucet is heavily corroded
-
Water pressure suddenly drops
These issues may indicate deeper plumbing problems.
Real Example: My Kitchen Faucet Repair
The first time I fixed a leaky faucet, I expected it to be complicated.
But the real issue turned out to be a worn rubber washer.
Here’s what I did:
-
Turned off the water supply
-
Removed the handle
-
Replaced the washer
-
Reassembled the faucet
The entire repair took about 25 minutes, and the replacement washer cost less than a cup of coffee.
The best part? The annoying dripping sound was finally gone.
FAQs About Leaky Faucet Fixes
1. Why does my faucet drip even when it’s turned off?
A dripping faucet usually means a worn washer, damaged O-ring, or faulty cartridge that can no longer seal water properly.
2. Can a leaky faucet increase my water bill?
Yes. A single dripping faucet can waste thousands of liters of water annually, which increases your utility costs.
3. How long does it take to fix a leaking faucet?
Most basic faucet repairs take 30 to 60 minutes, even for beginners.
4. Do I need special tools to repair a faucet?
No. Most repairs only require:
-
Screwdriver
-
Adjustable wrench
-
Replacement washers or O-rings
5. Is it better to repair or replace a faucet?
If the faucet is old or heavily corroded, replacement may be better. But in most cases, replacing small internal parts fixes the leak quickly.
Conclusion: Fixing a Leaky Faucet Is Easier Than You Think
A leaky faucet may seem like a minor inconvenience, but it can waste water, increase bills, and become incredibly annoying over time.
Fortunately, most faucet leaks are caused by simple wear and tear, and the fixes are straightforward. With a few basic tools and replacement parts, many homeowners can stop the drip in less than an hour.
From personal experience, the key is not waiting too long. The sooner you address a leak, the easier and cheaper the repair will be.
So if you hear that familiar drip tonight, don’t ignore it. A quick repair today can save water, money, and a lot of frustration tomorrow.